Tag Archives: How to

How to escape geoblocking by content providers with Squid

Have you ever encountered content that was “not available in your region” while surfing the web?

Have you ever wanted to watch one of the shows that Netflix has available in another country?

I bet you have, especially if you live outside the United States of America. The solution to this issue is easy enough: you can use a proxy server or VPN service. But there are two issues with that approach:

  • All your internet traffic is going through the VPN. If this can result in very notable delays when surfing your normal websites.
  • You usually have no insight into what kind of logging you VPN provider does. So you really shouldn’t do any sensitive stuff over that connection.

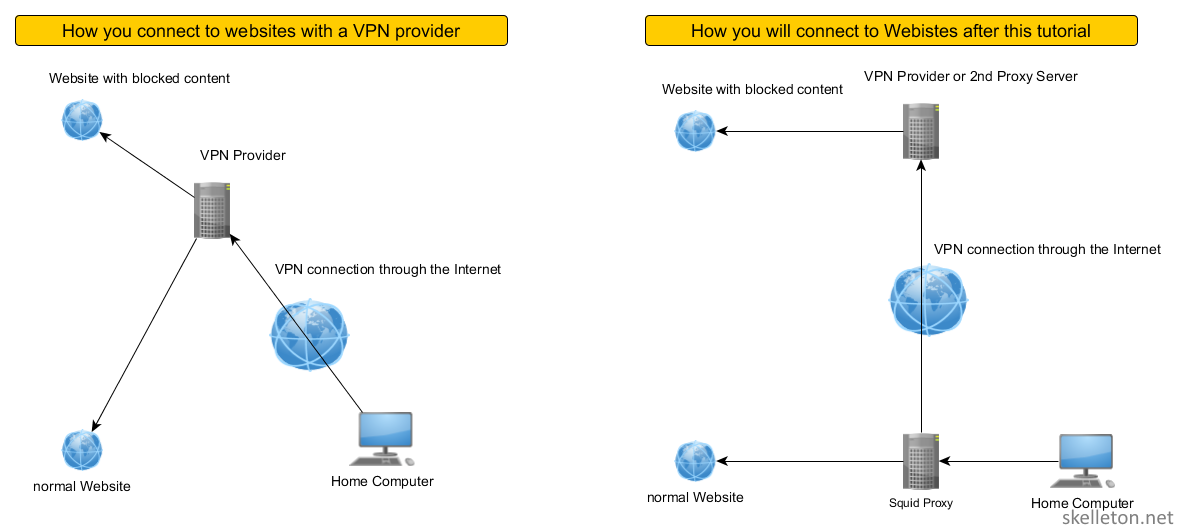
Ideally you would want all of your normal surfing to go out through your normal internet connection and all the region specific stuff through a VPN or some other proxy.
And you can actually build something to do this with Squid. Squid is an Open Source proxy server.

A proxy Server sits between your browser and the websites you want to surf to. It accepts all your requests to surf to certain websites and processes them according to its configuration. Once it has determined that the request is valid, it will contact the web server for you and fetch the content you want. It will then forward it to your browser.
Since it sits in the middle of your traffic, it is the perfect place to redirect some traffic through another connection.

This diagram visualizes the difference between the two options for you:

Diagram of the connections via VPN and via Squid

And this is really just the start of your capabilities of Squid. While this tutorial will only show you a few basics of squid and how you can redirect some content over a VPN or another Squid server, there is so much more that can be done with Squid:

  • Are you on a connection with a fairly low Volume available (like some mobile contracts)?
    No problem! Just crank up the caching in squid and repeated visits of the same website won’t be as demanding on your volume.
  • Have kids that that visit bad websites?
    No problem! You can use squid to filter the internet by pretty much any criteria your want. And you can do it on a per user or computer basis if you need to.
  • You hate ads on websites, but maintaining you Ad-Blockers across all devices is annoying?
    No worries! You can use squid as your Ad-Filter.

Continue reading How to escape geoblocking by content providers with Squid

The shocking Truth about the current state of your Data: How to built a fully encrypted file server with ZFS and Linux to avoid data loss and corruption

Do you know if all the Data on your File Server is OK?

Unless you are already using ZFS, Btrfs or ReFS you don’t. If your file server is a couple of years old, there is a very good chance that your Data is NOT OK.

Your server hardware might tell you everything is OK but that does not really tell you much because none of your monitoring systems check the actual data.

ZFS on the other had knows if your data is ok and can even repair it. I upgraded my file server recently. All the old disks that were still in the pool at the time were OK according to their SMART values. yet look what the monthly check told me:Scrub results of my Old Server almost 2 MB of Data had to be repaired. Just think about that: In just one month almost 2MB of data got corrupted. And right now you don’t know if your server has similar issues. If you did not know it yet this particular issue has a name: Bit Rot and it gets worse the older your current hardware is and more likely the larger your disks are.
You might not realise it but 2MB is a lot of data. It can be an important document or picture. Or it can be that it is just 2MB of a huge CAD file that is totally unreadable without those 2MB.
Granted my old server is quite a bit of an extreme example because I postponed the upgrade quite a bit longer than I originally wanted to. And the disks in it were not meant for this workload.

But I have seen quite a few that storage servers or NAS boxes remained almost untouched until a disk failed or they were full. So old hardware is not all that uncommon, especially at home and in the SMB market.

Now you might think setting up a new file server is easy right? You could just take Server 2012 with ReFS and Storage pools and be done with it.

Technically that is correct, but even in Windows there is really quite a bit more to consider. That being said I want to make the case for Open Source because for this purpose it is simply better than Windows.
In particular I want to show you how to build your file server with ZFS and Linux, two proven Open Source technologies. When you are done the Server will integrate nicely into your windows environment. Your users will not know the difference and you don’t have to get headaches from trying to license Windows correctly.

Continue reading The shocking Truth about the current state of your Data: How to built a fully encrypted file server with ZFS and Linux to avoid data loss and corruption

Setting up an Active Directory authenticated Mumble Server

Basic Setup

Setting up a Mumble server is fairly simple, but I had a few problems to get it to play nice with my Active Directory. And since there wasn’t exactly a great deal of documentation on the subject, I figured that I should write a short How To. Continue reading Setting up an Active Directory authenticated Mumble Server

Installing Oracle Linux and Apex

Recently I had to set up an Oracle Apex Server. Unfortunately the Apex Installer is delivered only as Windows 32 Bit installer and as a Linux 64 Bit RPM package.
Since I did not have any 32 Bit windows running, and neither any Linux system, that normally uses RPM packages, I decided to give Oracle Linux a try as base for an Oracle APEX Server.

What is Apex?

APEX is a rapid application development tool from Oracle. It lets you design, implement and deploy database applications with a very easy to use web gui. For common task like showing reports or creating forms for data entry you can use one of the many prepared templates. With APEX you could create an entire application around your database with little to no knowledge of any programming or scripting language.
If you need more specialised pages, then the default templates offer to you , you can build a page from scratch with any combination of predefined elements, custom PL/SQL code and custom javascript / HTML code.

Continue reading Installing Oracle Linux and Apex

Debian Wheezy E-Mail Relay for multiple Domains and IMAP Server with Postfix Dovecot and Fetchmail

One of our customers needed a way to use multiple mail domains. He already had a SBS2011, The Exchange Server on it was configured for the primary E-Mail Domain of the Company. The E-Mails from this Domain were fetched with the POP3 connector and all outgoing Mail was sent to the smart host of the E-Mail Provider.
The additional E-Mail Domains required a similar setup.
Unfortunately Exchange does not allow you to change the smart host for outgoing E-Mail based on the sender. There are third party Exchange addons, that do provide this ability, but I preferred to solve the problem with a Linux Mail Server. The configuration I will describe to you is fairly basic and the scenario it is used in is somewhat special. But the Article will still give you a fairly good impression on how to get a basic Mail Server running and how all the different pieces work together.

Continue reading Debian Wheezy E-Mail Relay for multiple Domains and IMAP Server with Postfix Dovecot and Fetchmail

Installing Horde 5 and configuring it for Active Directory and Dovecot

I have been using Horde for quite some time as my Webmail solution. Unfortunately the Update from Horde 4 to Horde 5 always produced some issues on my system, so I decided to do a fresh install. My old Horde was a very simple Setup: It used the IMAP authentication of IMP  to authenticate users against my Active Directory. While this certainly works, this time around I want to configure Horde to authenticate against my Active Directory directly. Additionally I wanted my to use my Active Directory as Global Address Book for Horde.

Continue reading Installing Horde 5 and configuring it for Active Directory and Dovecot

Building an Active Directory Authenticated and Managed OpenVPN Server Part 3

Now that OpenVPN was all set up, the only thing left to do was the Automation. The script that I created, takes care of the certificate/key creation of the users, the configuration customization, the configuration delivery, the Certificate Revoke List creation and configuration updates. Since this article is almost exclusively about one script, I will first loose few words about each of the main functions and post the entire script afterwards.

Continue reading Building an Active Directory Authenticated and Managed OpenVPN Server Part 3

Building an Active Directory Authenticated and Managed OpenVPN Server Part 2

After I outlined the goals for my Project in the last Article, it is time to get to work. This Article will cover the installation and configuration of OpenVPN. I will also explain how chained certificates can be used with OpenVPN. If you follow the my steps, you will have functioning OpenVPN server at the end. My first step was to create a new KVM machine and install Debian Wheezy. I am going to skip the description and assume, that you already have a functioning Linux to install OpenVPN on.

Continue reading Building an Active Directory Authenticated and Managed OpenVPN Server Part 2

Building an Active Directory Authenticated and Managed OpenVPN Server Part 1

With my new PKI and my Active Directory up and running it was finally time to integrate my OpenVPN into the infrastructure I build over the last couple of months. While I had an OpenVPN running for years now, it was not integrated into any central user database and relied entirely on password protected certificates to authenticate users.

For my new OpenVPN server I considered and tested the OpenVPN Access Server. That is the Commercial Project of OpenVPN, it has a very nice and easy web interface and it is very easy to integrate into Active Directory. I had a test VM set up and all tests went without a glitch. This is probably a very nice solution for most companies and the licensing fees are very reasonable. I was seriously considering to simply buy a couple of licenses and be done with it. In the end however there was some functionality that i missed in the web interface (or maybe have not found). Ultimately i decided to build my own solution since the paid version would not have saved me a whole lot of time.

Continue reading Building an Active Directory Authenticated and Managed OpenVPN Server Part 1

Implementing an SSL Certificate and the subordinate CA Certificate on Apache, Dovecot and Postfix

As promised, here a quick article on how to implement a certificate with chained trust into an Apache https server. You will need your server certificate and key and additionally the certificates of every intermediary Certificate Authority. Once you have those together move them to your web server. The key file should be kept in a directory with only root access. If you happen to have more than one intermediary Certificate Authority in your chain of trust you will have to put all the certificates into one file. The easiest way to do this is the following:

cat intermediate_intermediatecert_that_signed_the_server.pem intermediatecert2.pem intermediatecer3.pem > certchainfile_for_apache.pem

Once these preparations are finished, you need to open the config file of the virtual host. You need to adapt the following to lines to match the paths of your Certificates:

SSLCertificateFile /path/to/your_server_cert.crt
SSLCertificateKeyFile /path/to/your_server_key.key

They should be in the example SSL file provided by Apache. And in order to display your chain of trust you will need to add following line, tho show of the intermediary CA certificate(s):

SSLCertificateChainFile /path/to/Intermediary_CA_cert.crt

Restart Apache after this and you are finished. And while we are at it lets do Dovecot as well. Copy all the needed Certificates to your mail server. Dovecot does not seem to have a separate option for the trust chain. So just do the following:

 cat cert_mail_server.pem cert_intermediate_ca.pem > chained_cert.pem 

After this change the config file of dovecot “/etc/dovecot/dovecot.conf”:

ssl_cert_file = /path/to/chained_cert.pem ssl_key_file = /path/to/server_key.pem

And since we are on the mail server any, lets also change postfix. If your postfix is one the same Server as your Dovecot, you can simply use the files from dovecot. If not repeat the steps as shown for dovecot and then edit “/etc/postfix/main.cf”: 

 smtpd_tls_cert_file = /path/to/chained_cert.pem
smtpd_tls_key_file = /path/to/server_key.pem

Restart Dovecot and Postfix and your are done.

I used this Article as reference: Geeklab How to use chained SSL certificates