Do you know if all the Data on your File Server is OK?
Unless you are already using ZFS, Btrfs or ReFS you don’t. If your file server is a couple of years old, there is a very good chance that your Data is NOT OK.
Your server hardware might tell you everything is OK but that does not really tell you much because none of your monitoring systems check the actual data.
ZFS on the other had knows if your data is ok and can even repair it. I upgraded my file server recently. All the old disks that were still in the pool at the time were OK according to their SMART values. yet look what the monthly check told me:![]() Just think about that: In just one month almost 2MB of data got corrupted. And right now you don’t know if your server has similar issues. If you did not know it yet this particular issue has a name: Bit Rot and it gets worse the older your current hardware is and more likely the larger your disks are.
Just think about that: In just one month almost 2MB of data got corrupted. And right now you don’t know if your server has similar issues. If you did not know it yet this particular issue has a name: Bit Rot and it gets worse the older your current hardware is and more likely the larger your disks are.
You might not realise it but 2MB is a lot of data. It can be an important document or picture. Or it can be that it is just 2MB of a huge CAD file that is totally unreadable without those 2MB.
Granted my old server is quite a bit of an extreme example because I postponed the upgrade quite a bit longer than I originally wanted to. And the disks in it were not meant for this workload.
But I have seen quite a few that storage servers or NAS boxes remained almost untouched until a disk failed or they were full. So old hardware is not all that uncommon, especially at home and in the SMB market.
Now you might think setting up a new file server is easy right? You could just take Server 2012 with ReFS and Storage pools and be done with it.
Technically that is correct, but even in Windows there is really quite a bit more to consider. That being said I want to make the case for Open Source because for this purpose it is simply better than Windows.
In particular I want to show you how to build your file server with ZFS and Linux, two proven Open Source technologies. When you are done the Server will integrate nicely into your windows environment. Your users will not know the difference and you don’t have to get headaches from trying to license Windows correctly.
Update 2015-08-29: Updated configuration advise for ZFS datapools. Using the xattr = on setting resulted resulted in a delay in freeing space after a file was deleted.
If you are a returning visitor or are looking for something specific just jump ahead:
A short introduction to ZFS
About the Seagate Archive Disks
Get rid of Windows Once and for All: why it just doesn’t cut it compared to the alternatives
Warning: Your current Active Directory might not be prepared for Linux yet
How to prepare your old ZFS based Server for Migration
How to Install a fully encrypted Debian
Debian is installed what now?
How to Install ZFSonLinux in less than 5 minutes
How to Make your Linux Server talk to Windows: Samba4
How to make your Linux Server share files with other Linux Servers
How to Encrypt without loosing all the awesome ZFS features
How to Transfer Data between ZFS file systems
How to transfer your data from Windows to Linux
Warning: do a few basic checks before moving on
How to get rid of obsolete zpools, datasets and snapshots
How to Be Smart in a World of Dumb users
Can’t Keep up? Automate common maintenance tasks
Some final advice
Before we start, it might be good for you to know how my old server looked and how the new one looks. I hope this will help you understand the background of this post a little better and maybe even help you recognize some of those issues in your environment.
If you want to skip this part, then remember at least this: Old hard disks are dangerous.
My old file server was based on OpenIndiana (a Solaris with the Open Iluminous Kernel). It ran Napp-It on top of that for easy management from the browser. The server did what it was supposed to and it was very reliable. So you might believe that there was no need for a change.
Unfortunately the OpenIndiana project seems to be a little stalled at the moment and updates don’t happen at a pace that I like. And since the hardware replacement was going to cause downtime anyway, a look at the software couldn’t hurt.
The only hardware that was replaced during the upgrade, were most of the hard disks. All the disks are still powered by a Xeon L3426 with GB ECC RAM on a Supermicro X8SI6 Mainboard. The board has two additional rebranded LSI HBAs in addition to the one onboard. And all of that is housed in a Linan Li D8000 cube tower. That is one of the few non rack cases on the market, that can easily house over 20 disks.
In the old configuration the Server had several Zpools made up of the following disks:
- Media pool:
- 8x2TB raidz2 mostly Samsung 204ui
- 8x2TB raidz2 mostly Samsung 204ui
- 4x3TB raidz Seagate NAS drives
- Data and Server Backups
- 3×1.5TB raidz Seagate Barracuda Drives (The ones that were famous for dieing)
- Temporary Storage used during ripping and such:
- 1x2TB WD Red
That is quite a few of drives and most of them are quite old and not meant to run 24/7. While I planned this upgrade there were even a few drives that failed:
Replacing them would have been somewhat difficult since almost all my old storage pools were created in a way that optimises for 512 byte sectors and getting drives with real 512 byte sectors can be quite hard or expensive these days.
So I opted for not replacing the failed drives in the hopes that the pools would hold out long enough (don’t do this if you don’t have backups or can’t afford down time).
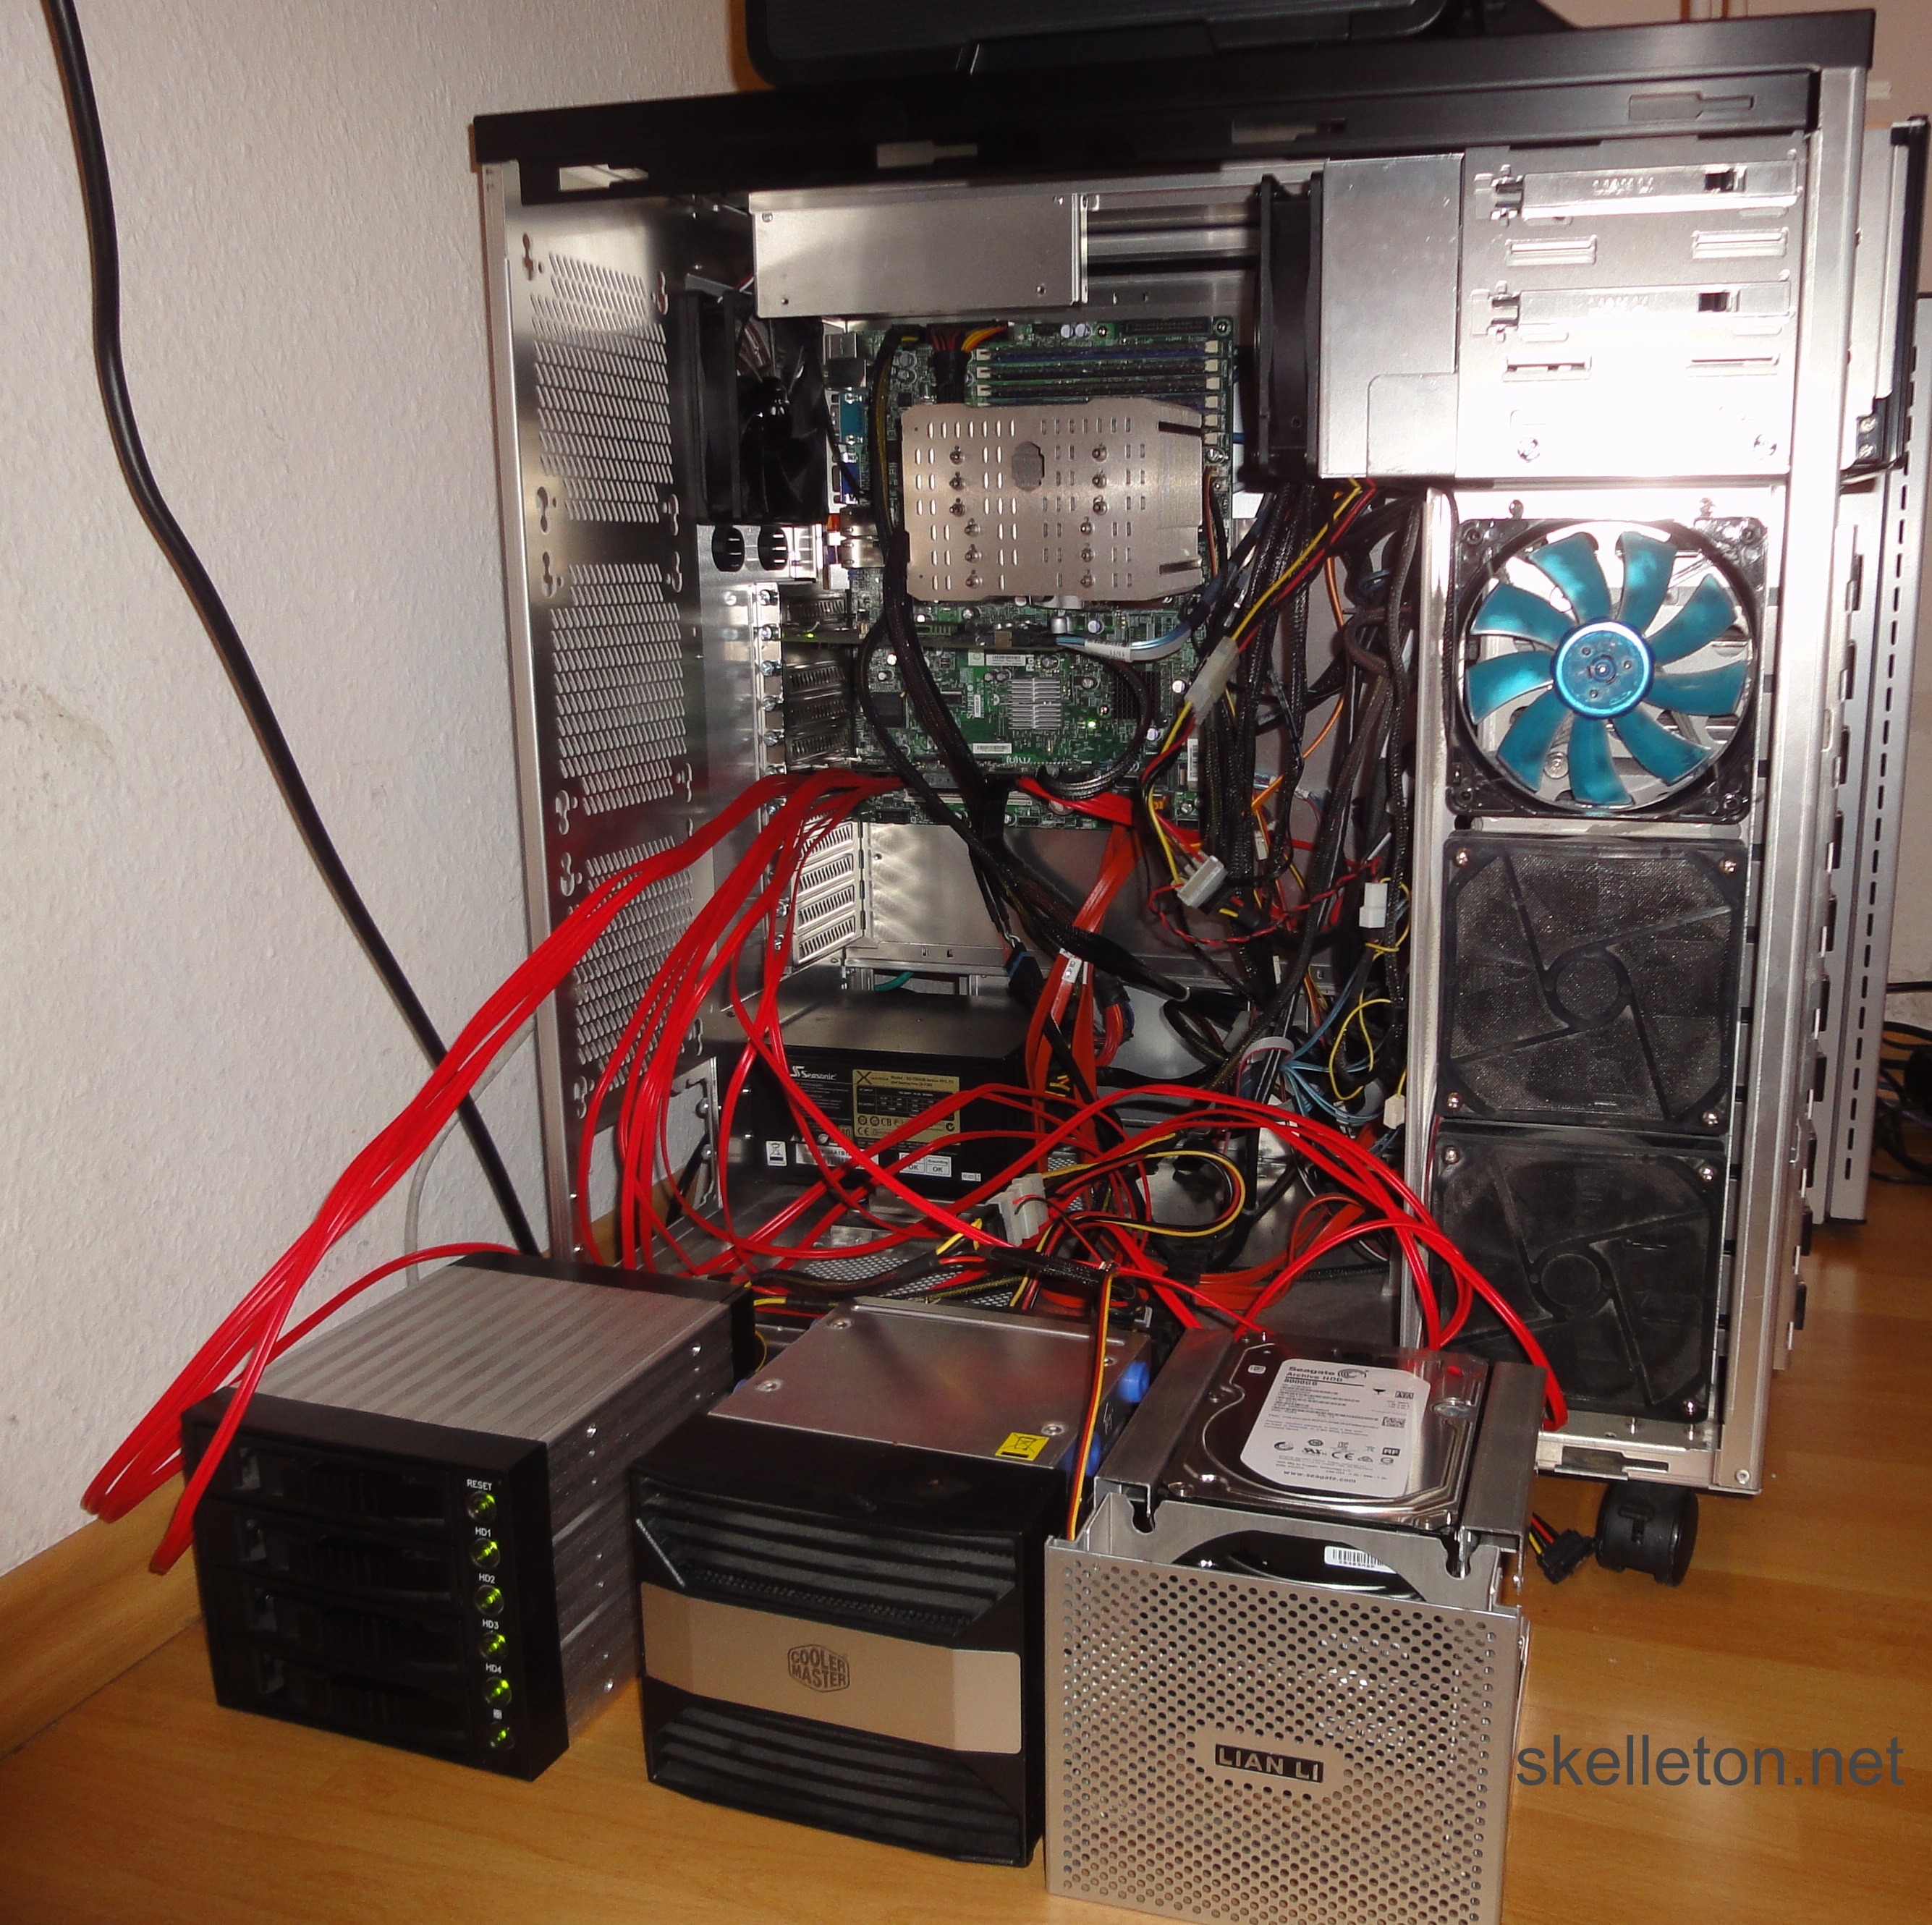
After the upgrade all disks in the server are encrypted. All the old 2TB disks except the WD Red are no longer in the server. They got replaced by a raidz3 of 11x 8TB Seagate Archive disks. The 1.5TB disks of the Backup pool got replaced by the 3TB NAS drives there were in the media pool previously. The three SAS/SATA HBA controllers and the onboard disk controller did not have enough SATA ports for the upgrade. Because of that I used an Intel RES240V expander temporarily during the upgrade. I also lacked enough SATA power connectors, but I did some downright unholy stuff with 1 to 4 port power adapters to take care of that.
Naturally the result was a bit of a mess during the upgrade: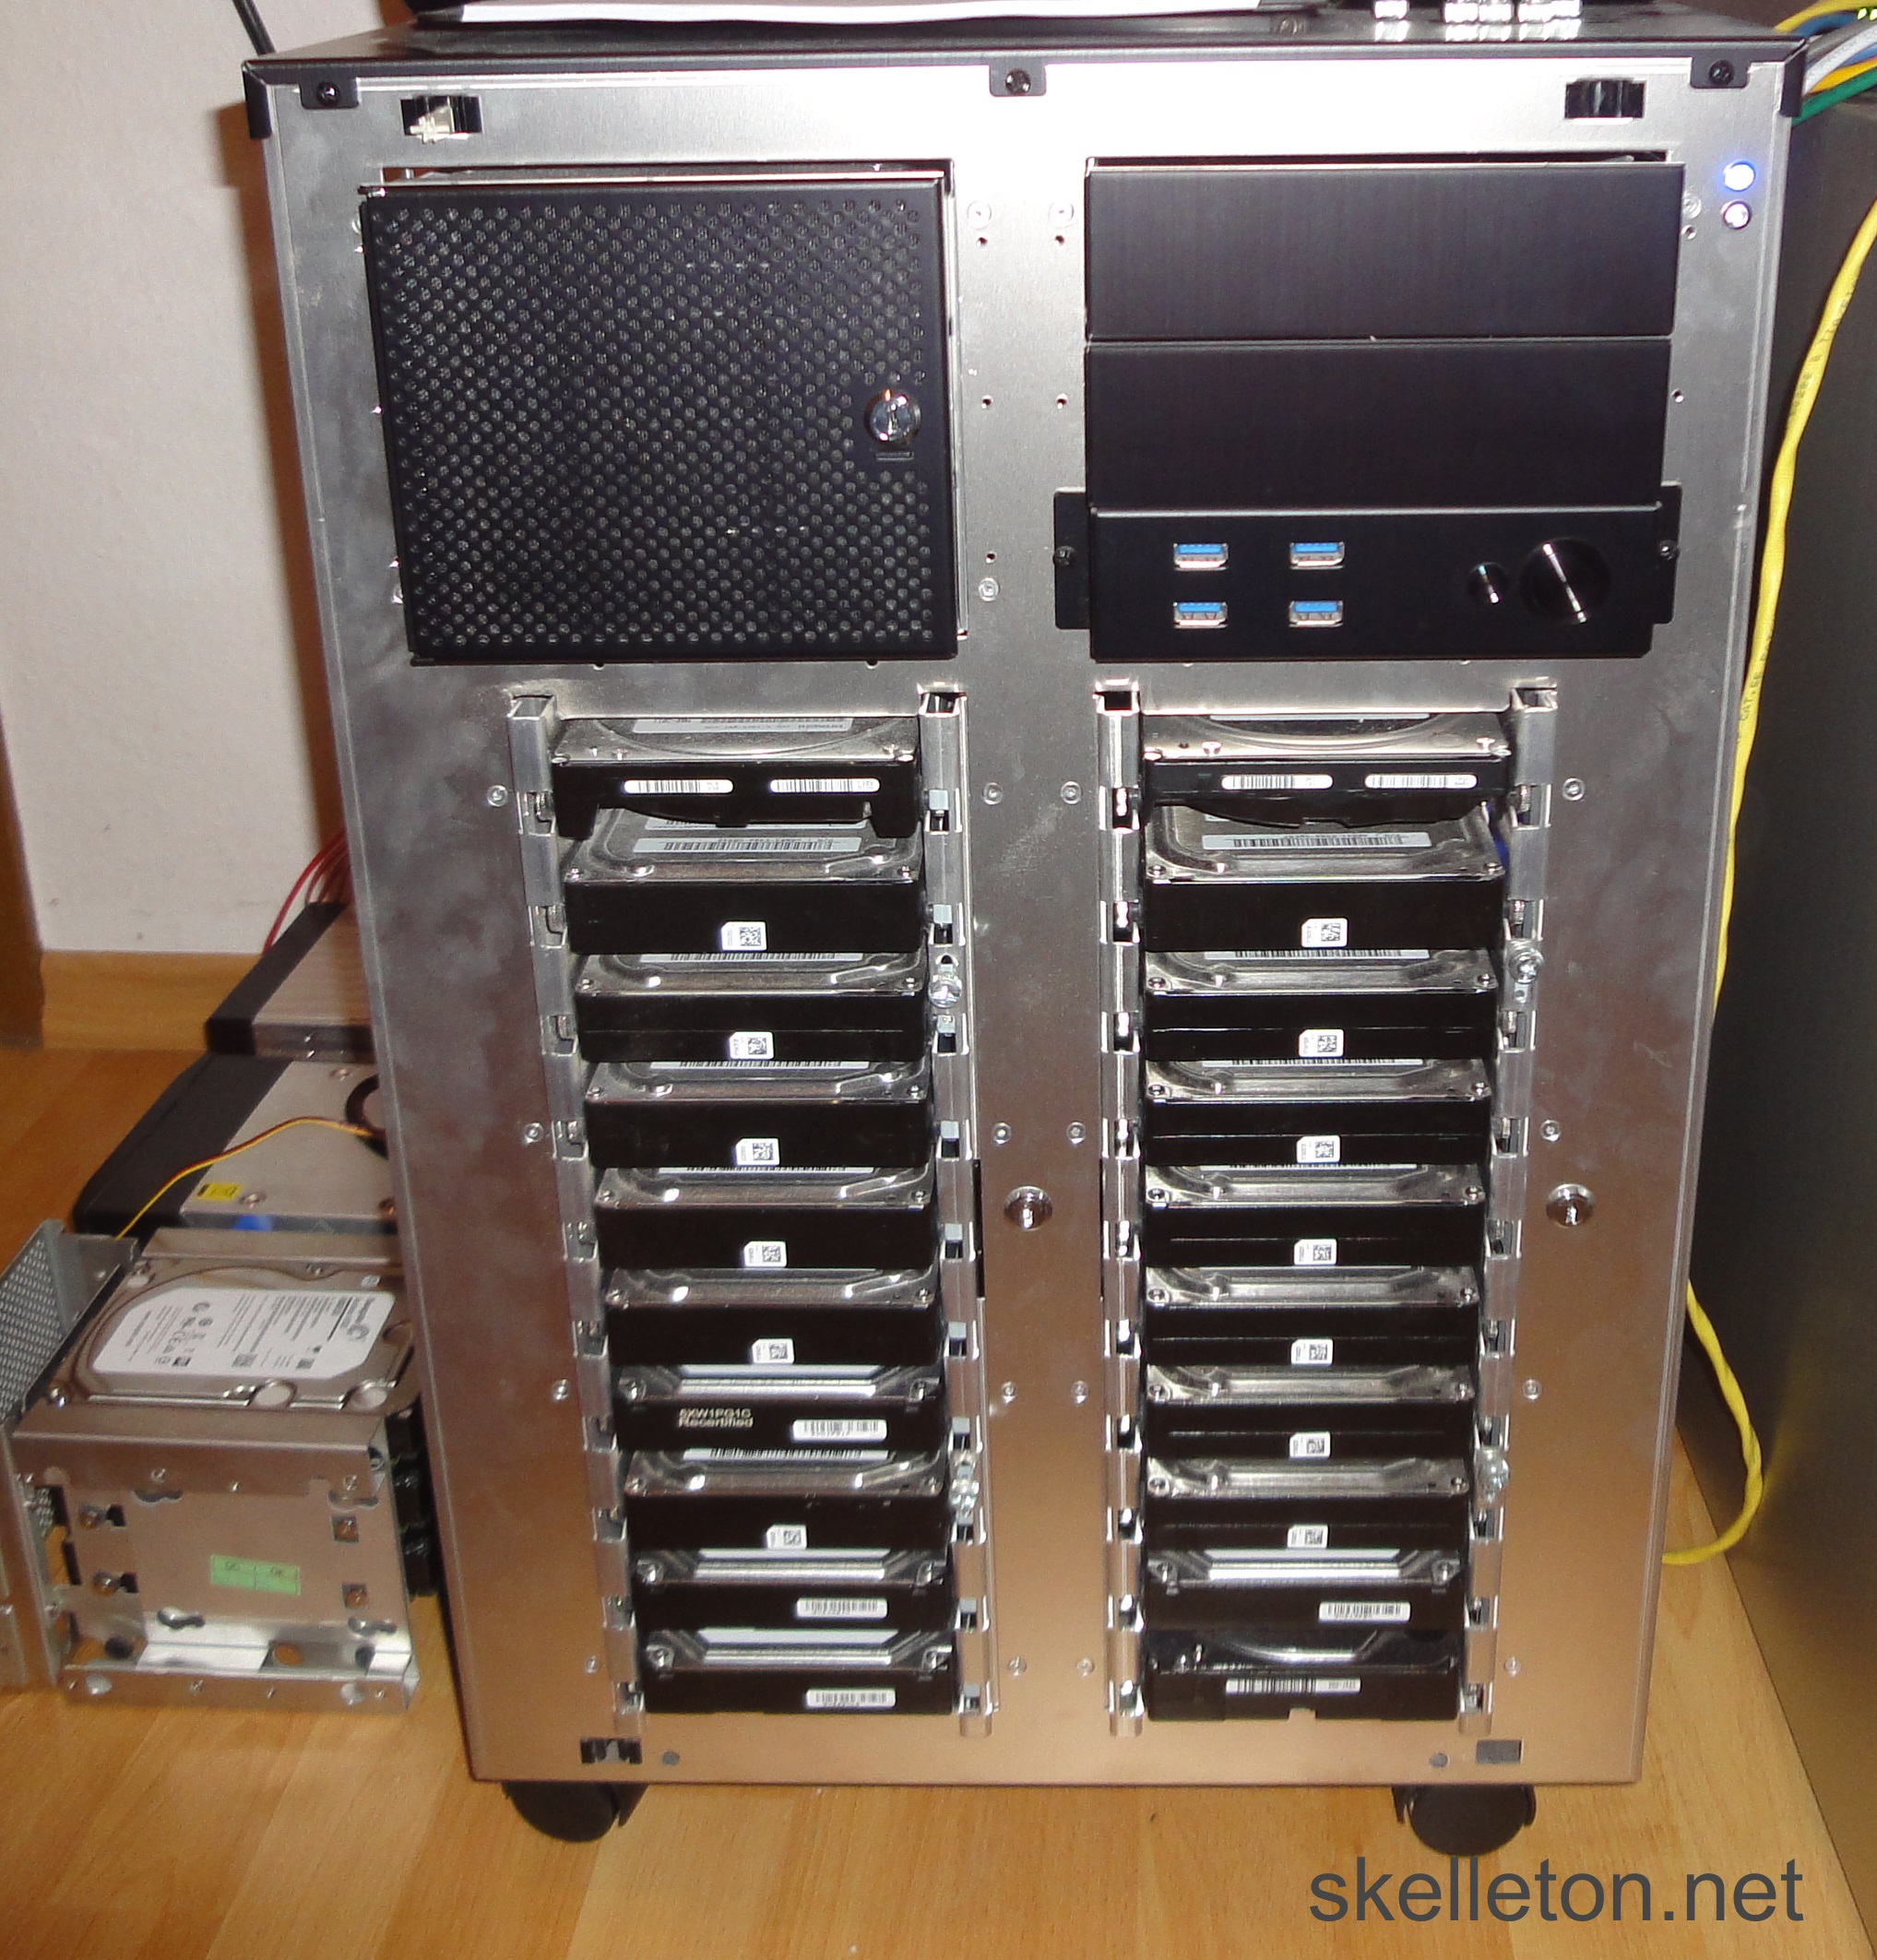
But in the end the Server had a massively larger storage pool and a few free disk bays fore future expansion: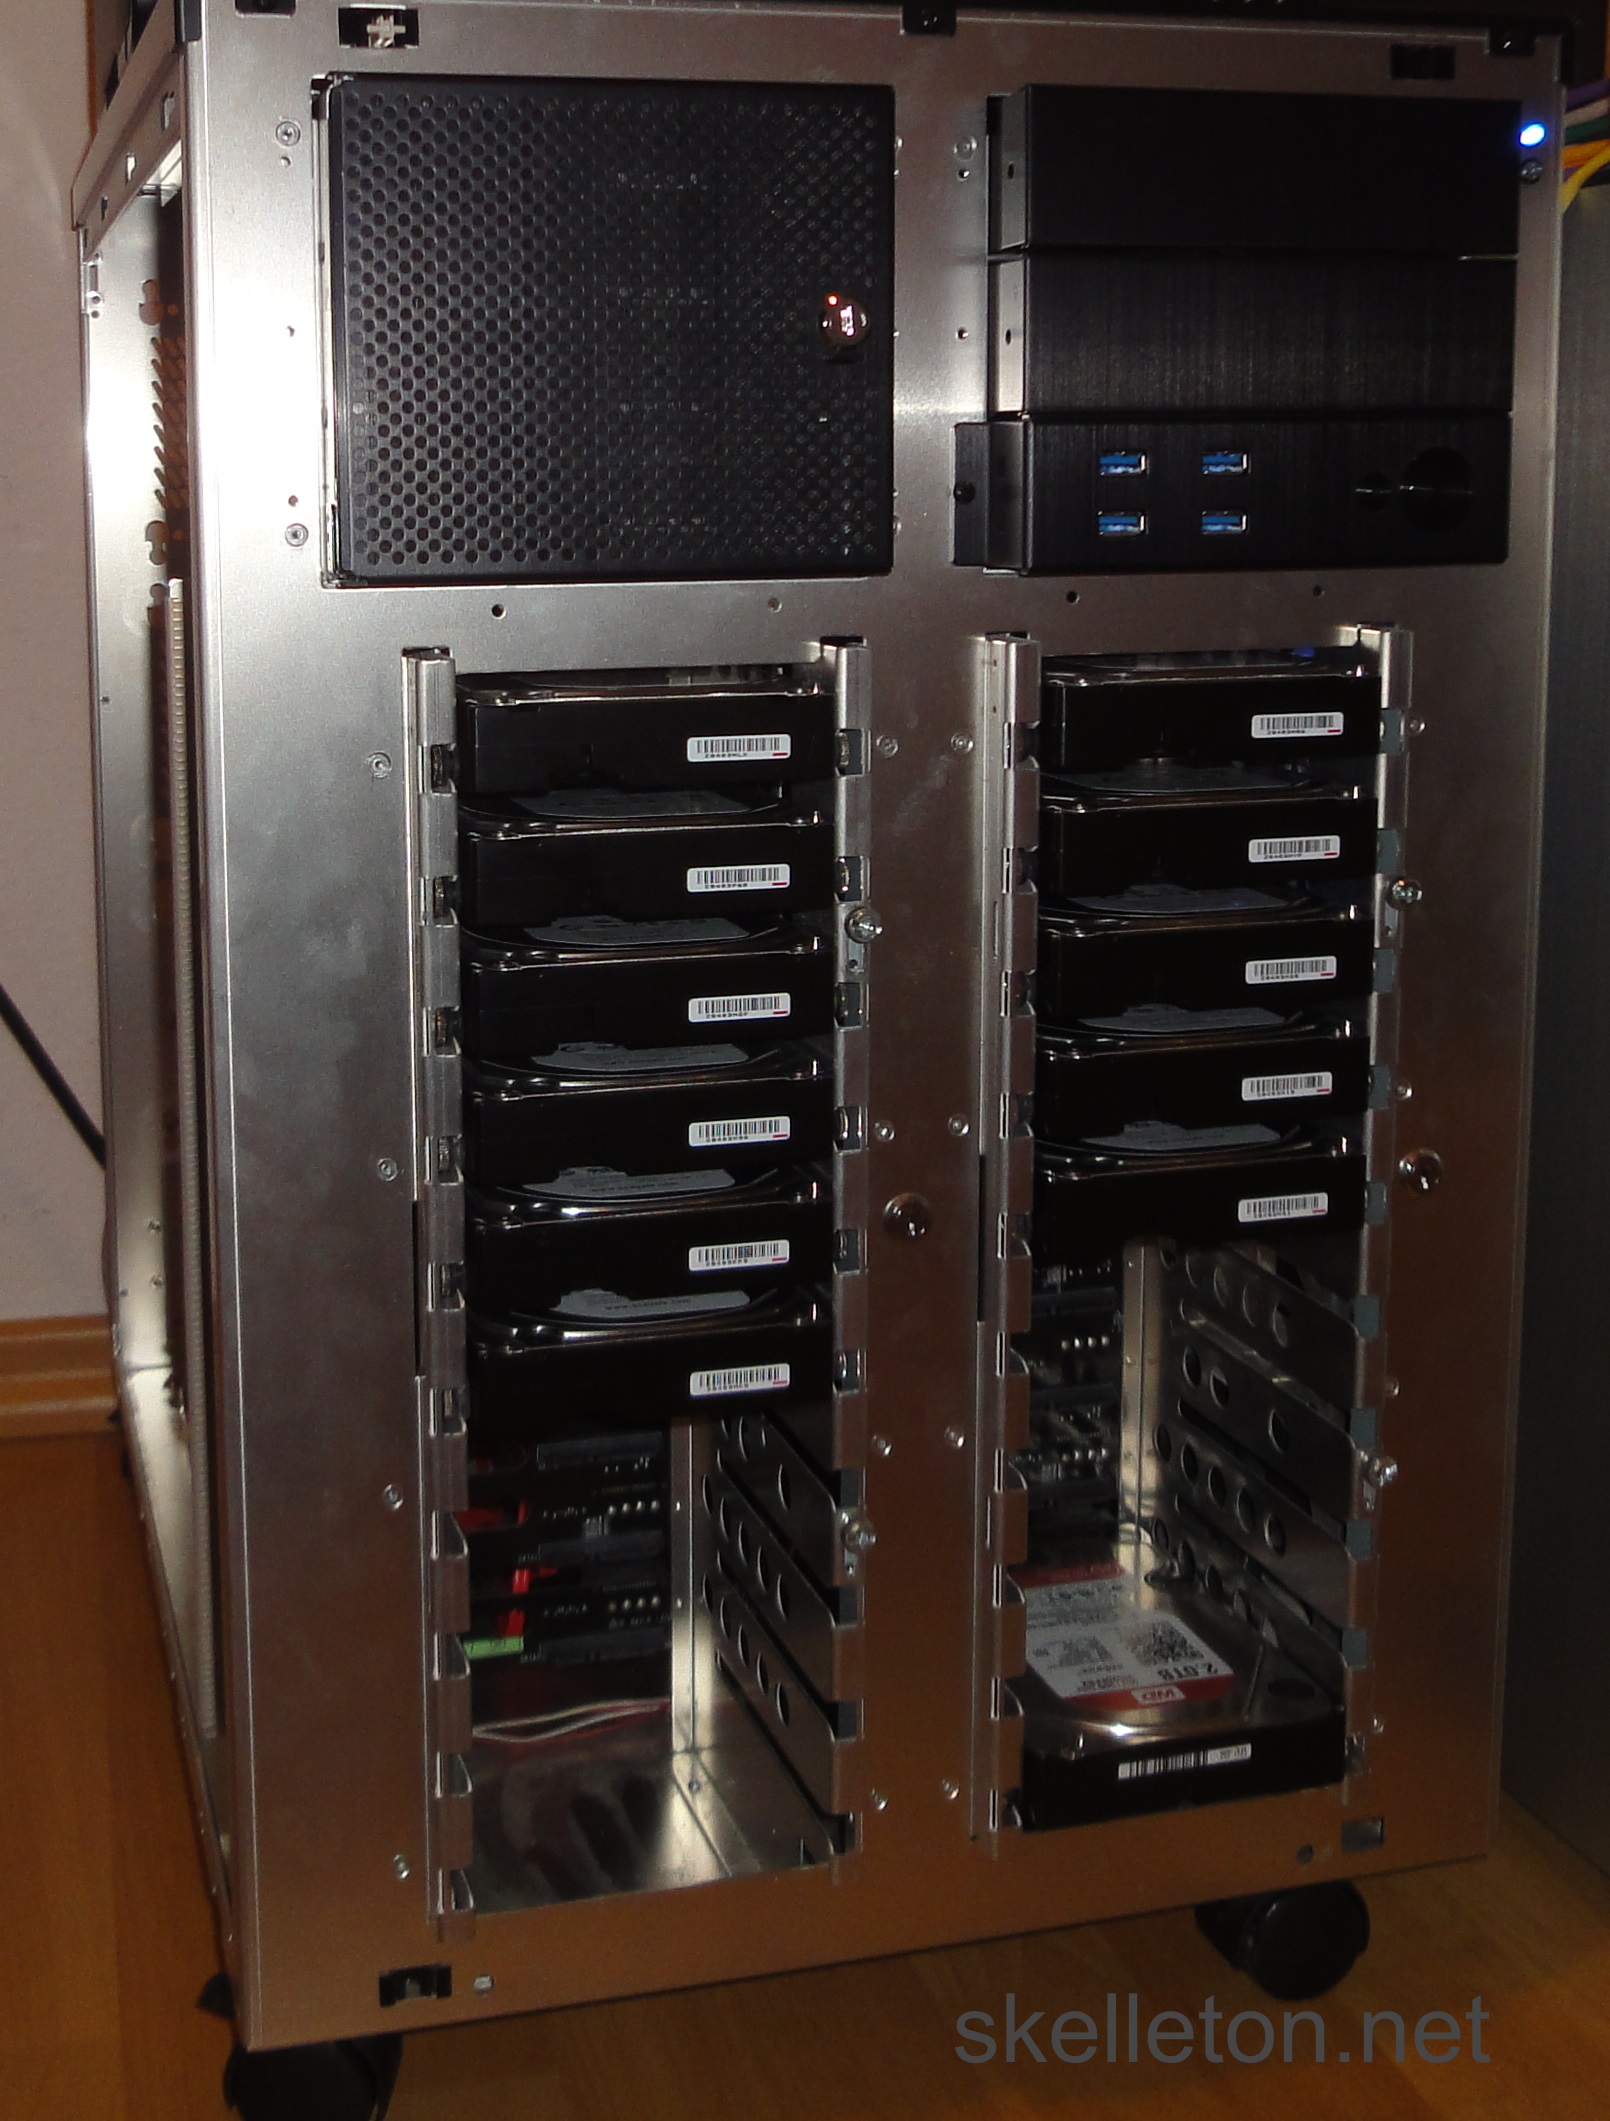
But the cable management could be improved: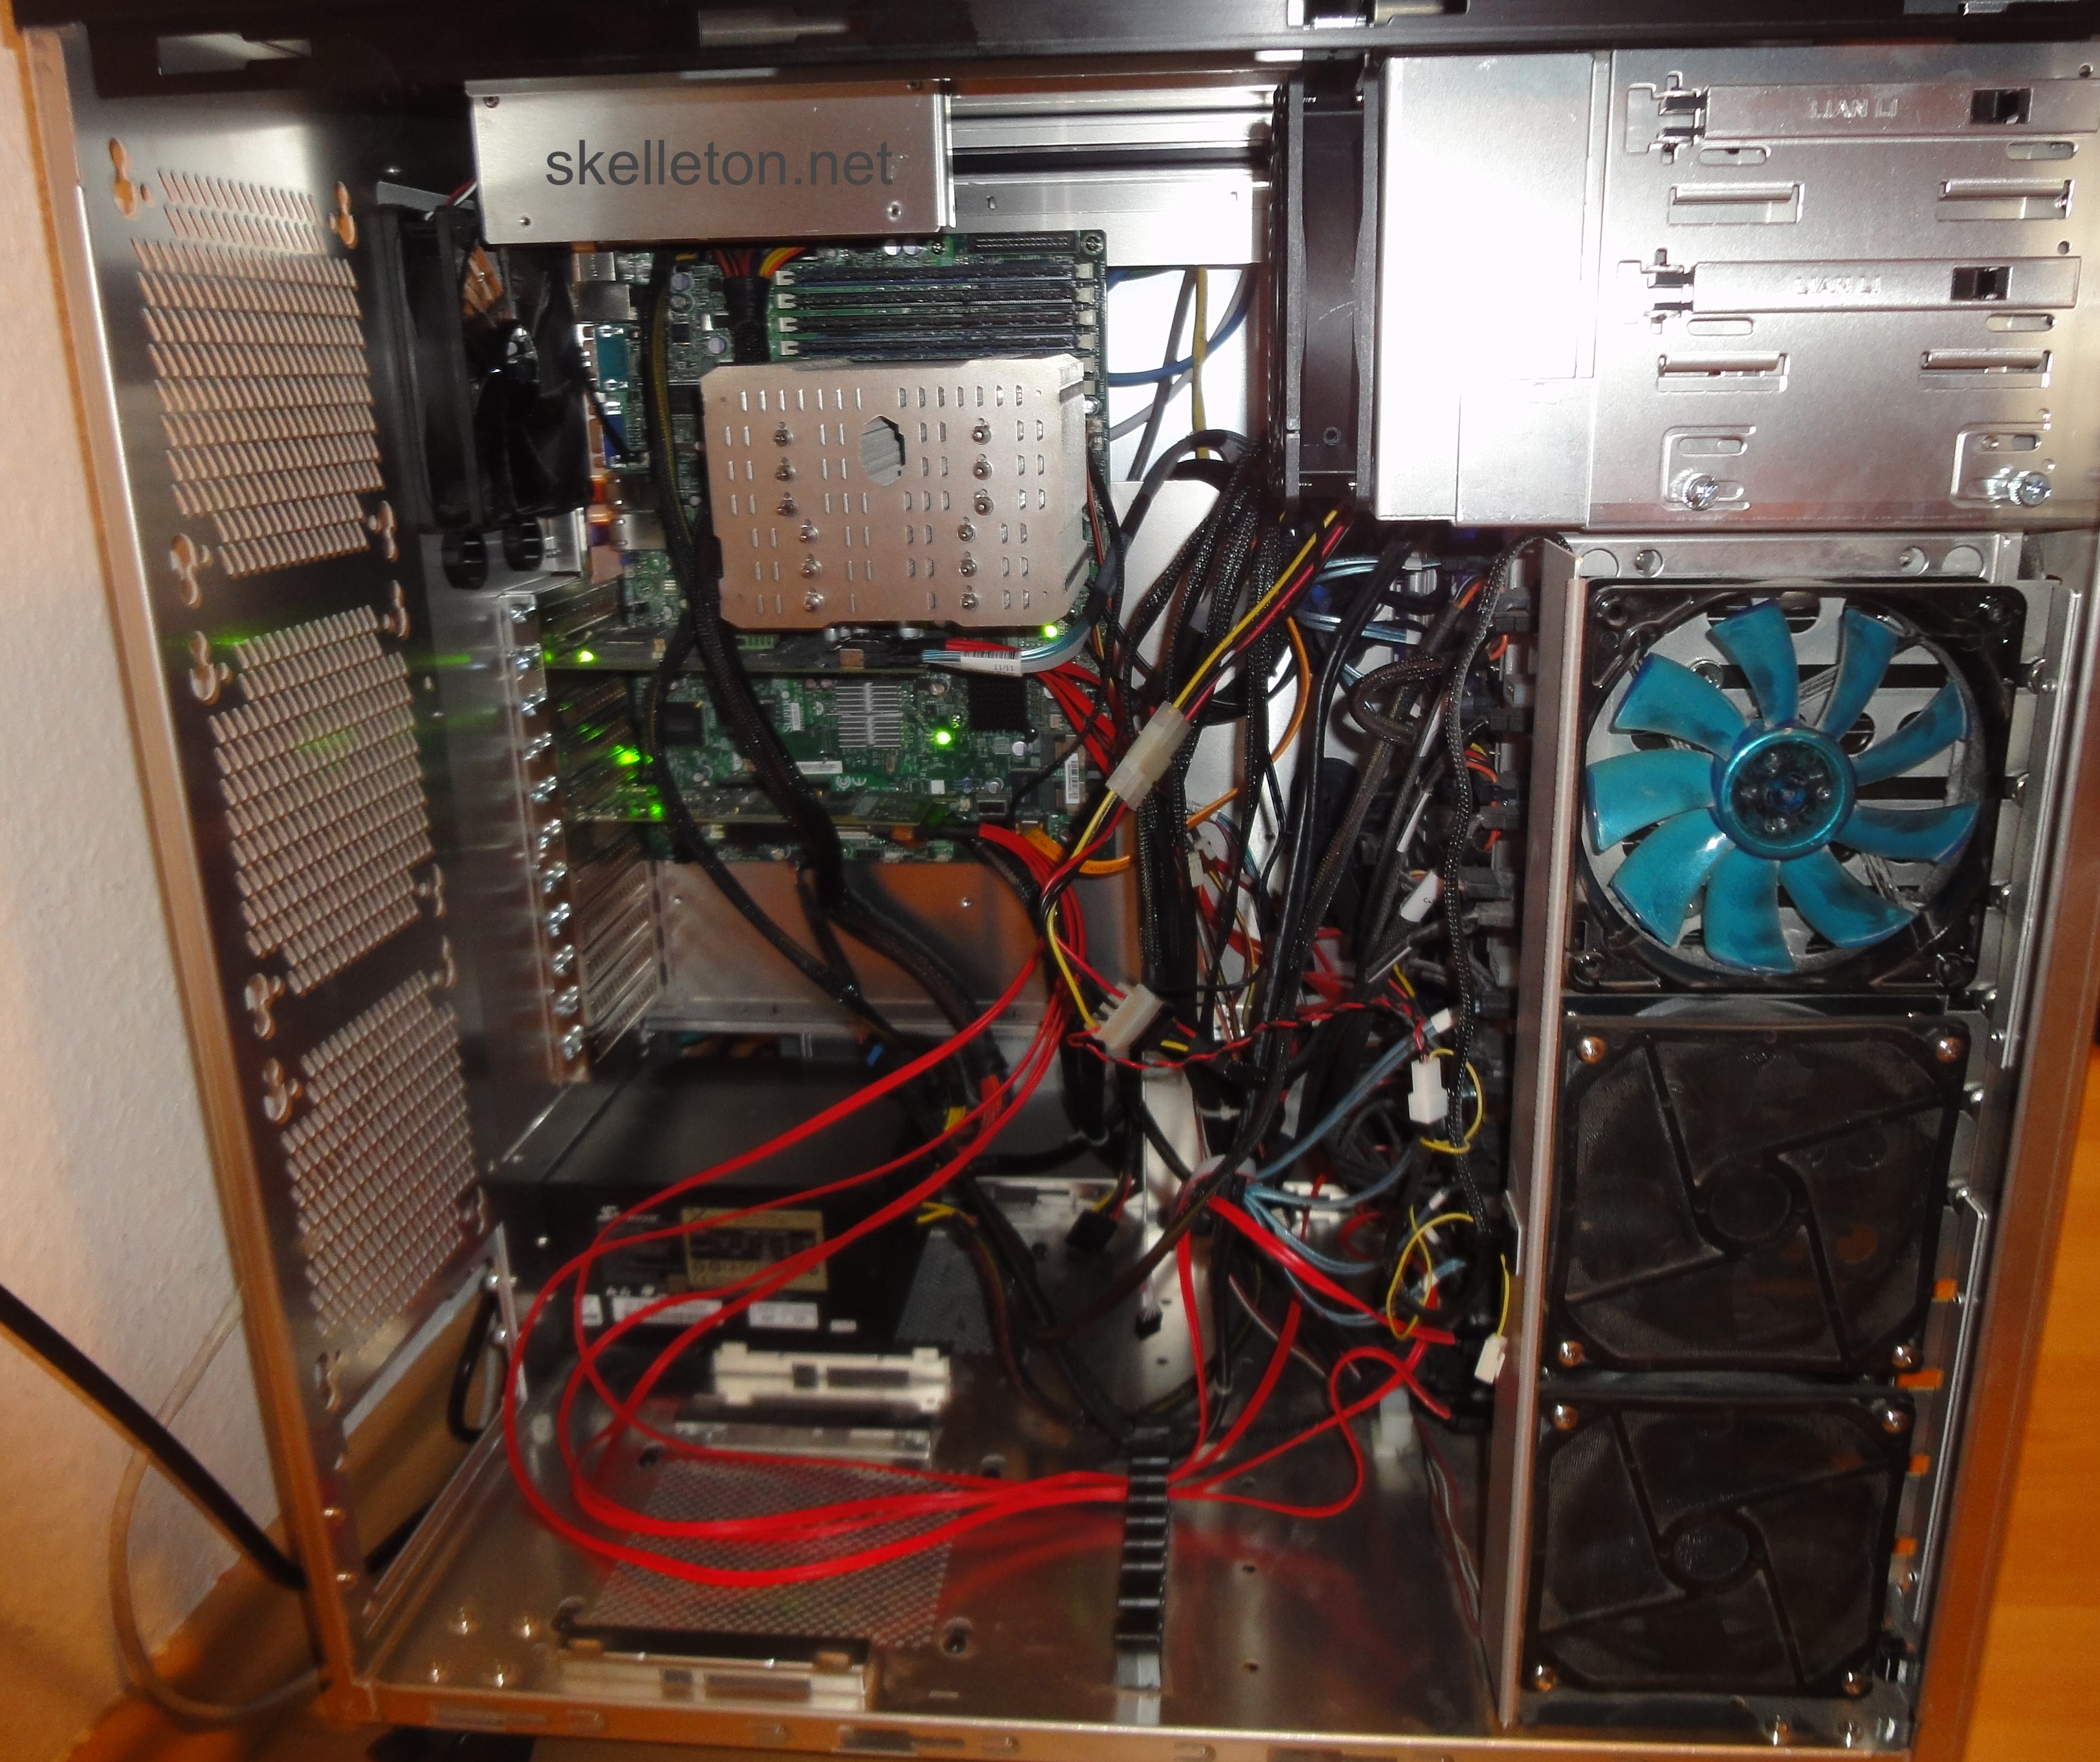
A short introduction to ZFS
Before we go on you should know a little bit about ZFS to understand just how awesome it is.
ZFS is a file system that was originally developed by Sun for Solaris. Though calling ZFS a file system does not convey the full picture. ZFS is not only a file system it is disk management, software RAID, Filesystem and share management rolled into one. ZFS was built for reliability and scalability.
Some of you might protest that ZFS is new and that using something this new could impact the stability of your systems and the security of your data. But you are wrong. ZFShas been around for over a decade and in the it world that is certainly not new anymore. It is just not ancient like many of the commonly used file systems.
Not using ZFS because it is new is like using a horse carriage instead of a car for your daily commute because cars are new and your don’t trust them.
If you are not yet convinced about ZFS just has a look at its features:
- ZFS is a copy on write filesystem: You change a file and ZFS will write a copy of that file to your disk. After the copy is written without errors ZFS will delete the original file. This will enable you to recover from server crashes during the write process because a ZFS volume is never in an inconsistent state
- There are checksums for all the data and metadata this allows ZFS to detect (and in many cases repair) any errors in the stored data.
- Scrubbing is the process that detects and corrects data errors based on the checksums. Unlike fsck scrubs can be run while the filesystem is mounted and in use.
- ZFS allows you to build traditional RAID combinations and combinations that can handle even more failed Disks
- You can stripe data across multiple ZFS virtual raid devices
- ZFS uses the RAM heavily for caching and even supports SSD caching(though you probably shouldn’t use ssd caching at home)
- ZFS supports snapshots. Due to copy on Wirte the snapshots are easy and fast to create and don’t need a lot of overhead in terms of storage space. The snapshots are possibly THE killer feature in ZFS.
- ZFS supports deduplication out of the box. With that being said Dedup needs a lot of ram to be performant and you will likely not need it in home use
- ZFS is a 128 Bit Filesystem. That means it can handle pools so large, that the number would not have any meaning to you. Lets just say you really wont be able to hit that limit in the foreseeable future.
- You can easily replicate entire file systems to to different Storage Pools or even different ZFS hosts with built in tools
- ZFS supports ACLs such as those of Windows (the Linux version does only POSIX ACL’s but this will not be noticable in the front end)
- ZFS supports compression at very little performance loss
But as with all software ZFS is not perfect. Here are a couple of limitations and issues that you should be aware of:
- There are currently two versions of ZFS in the wild, the oracle one and the Open source one. The Oracle version is only used in Oracles Solaris. All other ZFS implementations (even the free iluminous Solaris Kernels) use the Open Source implementation of of ZFS
- In their current state these two implementations are not compatible to each other anymore, since they developed different feature sets by now
- Currently only Oracles Solaris implementation supports encryption from within ZFS
- Disk management is not quite as flexible as some other abstraction layers out there. You can not add or remove disks from the virtual devices. And you can only add new virtual devices to a pool. But you can’t remove them
- While usually to install under Linux it is not part of the Linux kernel, and may never be part of it due to it’s licensing. Though there are people working on that.
- You shouldn’t run ZFS on top of a RAID. ZFS performs best, if it can manage its disks by itself
- Deduplication is always done over the entire zpool. You can’t do deduplication over only a single dataset.
- Neither the raid like features of ZFS, nor Snapshots replace the necessity for backups
- ZFS does not automatically rebalance pools when you add new vdevs. It will however rebalance the pool over time by doing more writes to the new vdev until the storage use on the different vdevs is balanced.
Even with those limitations ZFS is still better than any other file system currently out there because all other file systems have bigger drawbacks or don’t even attempt to solve problems that ZFS solves.
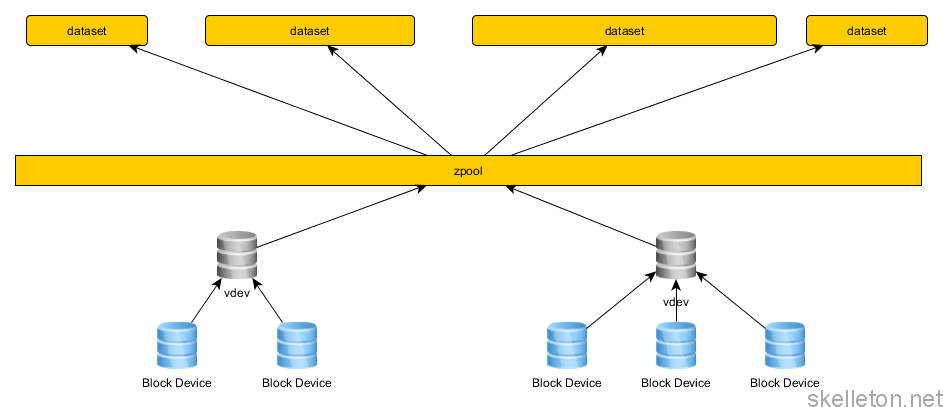
In order to understand this article and to work with ZFS you should know a few terms and tools that are important when working with ZFS:
- vdev: Stands for virtual device. This is an abstraction layer to which you can add any kind of block device. In most cases this will be disks. If you add multiple block devices into a vdev you can use them in non striping raid configurations. These configuration options are mirror and raidz. With a mirror you can build vdevs that function like the RAID1 usually does, but you can also mirror over more than two devices. Raidz is based on parity calculations like RAID5 and RAID6. Depending on the level you choose, ZFS allows for 1-3 parity disks in a vdev
- zpool: Is the logical volume presented to the operating system if you will. A zpool can consist of one or more vdevs. Data will be striped across all possible vdevs, this means combined the the raid like capabilities of vdevs, you can build all the usually used RAID configuration with ZFS. While it is recommended, that ever vdev in a zpool is build the same way, this is not necessary. You can build a zpool with one vdev as a 3x2TB raidz and later extend it with a 6x4TB raidz2 vdev without a problem. But naturally there won’t be much striping in that particular case.
One general rule of thumb is, the more vdevs in a pool, the better the performance. - dataset: A dataset is the equivalent to filesystems and partitions in the non ZFS world. A dataset is dynamic and sees the available storage on a pool. Though you can give it quotas to limit its growth. You can even attach properties such as smb share or nfs share to the dataset. This will try to create these shares when the pool is mounted.
- scrub: A scrub is the filesystem integrity test of zfs. A scrub can be run while the filesystem is in use will check the integrity of all the data and metadata in a zpool with the help of checksums. It will try to repair the data as far as possible. Unlike fsck checks in traditional filesystems that only check the metadata, a scrub can take several hours or even days to complete on large pools because it checks all data stored in a pool.
- resilver: A resilver is the repair process in ZFS. A resilver will happen if a scrub finds damaged data in a pool, or if one of the disks in a vdevs is replaced.
If you are more of a visual thinker, have a look at this diagram, that shows how which element of ZFS is used:
Before you go out and build something like that be warned: even if ZFS lets you build something like the above, it is not a good idea.
You should be aware of a few best practices before you start:
- Do not mix disk sizes and disk speed in a vdev
- Do not mix vdevs with different mirroring/ parity schemes in a single zpool
- Do not mix vdev with different disk sizes or disk counts in a single zpool
- Use the entire disk for ZFS instead of just an partition
- Scrub regularily
- Build multiple smaller pools rather than one large one if your storage has different performance requirements.
- Use compression. LZ4 compression has little to no performance impact.
- Avoid using deduplication because it requires hughe amounts of RAM. If you absolutely need deduplication, build an extra pool for it because deduplication is a pool wide feature.
- Use ECC RAM. This one is geared more towards home users. ZFS is geared towards protecting you data from corruption without ECC RAM it would not be possible to detect or correct data corruption that happens in memory.
- Try too keep at least 20-30% of the pool free otherwise the performace of the pool can degrade.
- Use an even number of data disks in raidz configurations and then add the parity disks.
- ZFS snapshots do not replace your other backups.
About the Seagate Archive Disks
There have been quite a few discussions and very mixed reviews about the new Seagate Archive disks. I ultimately decided to buy some because they just seem to be made for large media archives. Since they are based on fairly new technology (that is not used by any other drives on the market) I wanted to say a few words about them.
They are based on a technology called SMR or Shingled magnetic Recording changes how the tracks on a hard disk are aligned on the Platter. They are not aligned in a 90 degree angle towards the platter surface anymore but rather a much lower angle and they overlap each other. You can imagine this like shingles of a roof.
Because of that the tracks can be thinner without the risk of loosing data.
And just like you can’t just change one row of shingles on your roof, you can’t just overwrite one single track of data.
In these HDDs, that is because the write heads on the disks are larger than the read heads and they are thicker than a single track now.
This means if data on the disk has to be rewritten, all neighboring tracks have to be rewritten as well. To limit the effect the tracks on the disks are grouped.
This makes SMR disks really bad for write intensive applications like Databases or File Storage that changes a lot.
But the Archive disks are great for cold storage or write once read many types of use cases (like an Media Archive). Especially if you consider the price per Terra byte compared to other 24/7 capable storage.
They seem even more perfect for copy on write filesystems, since the original data doesn’t have to be rewritten.
Due to the size of those disks I opted not to do a complete burn in test of the disks by filling them once before using them. Instead I transferred my existing pool(roughly 40TB to write in raidz3) over to those disks and then rand a scrub.
This resulted in a couples of days of permanent write and read operations. If the drives survive such heavy use, they are not DOA.
So far my experience with the disks has been very good. No unexpected drops from the pool or any such thing. If you need lots of relatively cheap storage and the limitations of the SMR technology are not a problem for your use case, you should go for these drives.
Get rid of Windows Once and for All: why it just doesn’t cut it compared to the alternatives
There are quite a few options for operating systems for file servers. Three of those looked like a a possible fit:
- Omni OS: Honestly this is a good option. But the better hardware support and the larger community make Linux the better platform for most people. If you have somebody already familiar with Solaris though, you might want to try this instead of a Linux. If you want to try Omni OS but you don’t have anyone familiar with Solaris give Napp-It a try. This way you will have to touch the command like only rarely.
But this might cause you problems if you have to troubleshoot and you don’t know the operating system.
Pros:- ZFS is native to Solaris. Thus there is a better integration in some areas.
- There is a choice between using the native SMB Server or Samba
- Windows ACL’s are very easy to handle here. And it can handle actual windows ACL’s not just posix ACL’s.
- Napp-It works and is optimized for this platform. So you could basically do the entire server management through the Webgui
Cons:
- Far fewer people are familiar with Solaris compared to Linux and Windows. Which means it is harder to find qualified employees for business and the community is smaller
- The Kernel based SMB server only seemed to do the old ntlm authentication by default. This one is based on my Experience with OpenIndiana and hopefully that is not the case anymore.
- The Kernel based SMB server does not support following symlinks between different zpools. Samba capable of doing that and available for Omni OS but it is not the preferred smb server there.
- Group policies don’t work even if domain member
- Hardware Support on Solaris is not great. This is especially a concern for Home users.
- Windows 2012R2:
With ReFS and Storage spaces, you actually have features similar to ZFS such as CRC checking and building pools with redundancy. But those features are not as mature as ZFS.
And the performance of ReFS and storage pools is not great.On top of that the licensing adds another layer of complexity. And the cost can also be quite a bit high if you are a home user. You also have to consider that you will probably need Client Access Licenses and you have to read all the license documentation very carefully if you don’t want to get screwed over in the long run. If you think that it is not that bad, just listen to this story that one of the fellow admins told me at a Microsoft licensing seminar:
Their company had been using Microsoft office since the 80s and always used upgraded the office License to the next version. About a year after they migrated their users to Office 97 their user base grew quite a bit and they bought new Office 97 licenses to effectively double their Office 97 license pool. In 2010 they got an MS license audit and MS declared half their Office Licenses as illegal.
It turns out that the second batch of Office 97 licenses they bought had a slight modification in the License Aggreement that explicitly forbade them from being upgraded by later versions.If you are not in the mood to double check the license for stuff like this you should avoid buying Microsoft and other proprietary software whenever possible.Even if that scenario is not your concern then think about this: how much time do you spend comparing the different valid licensing scenarios for a MS product to figure out what the best deal is?
In any larger installation this time can get quite ridiculous.
Pros:- Fairly easy to use for somebody who is familiar with Windows/ It has a GUI
- Native AD support including GPOs ( and from MS itself)
- Plays well with windows only environments
- All the newest domain features and secures authentication mechanism are available
- Quite a lot support available in different communities and vendors.
- Sysadmin are dime and a dozen.
- you can find the most common problems and their solutions on Microsoft technet
Cons:
- Storage Spaces still had some performance problems
- It is not open source
- NFS on Windows was never Ideal
- Bitlocker — it is encryption but it is closed source. It is only safe as long as you absolutely trust Microsoft
- Licensing is quite expensive for a Home Lab ( though acceptable considering what I spent on hardware)
- Licensing is extremely time consuming, complicated and annoying.
- You may not be allowed to use all the features of the product you bought because it is forbidden somewhere in the depths of the license. (Think RDP: you are only allowed to use RDP to connect to a Windows Client machine over RDP if it has an enterprise license)
- Napp-It does not work for windows (to be fair it doesn’t make much sense for it and I would probably be able to find different tools to display system health and basic maintenance in the browser)
- Debian:
This kind of stands in for all Linux distributions and I choose Debian here because it is rock stable. None of the downside are truely big. And the advantages of having it can’t be overlooked:
Pros:- ZFSonLinux is easy to install and the use is pretty much the same as on Solaris. (Which means Solaris documentation for ZFS is in large parts relevant to Linux as well)
- It is is not that hard to find sysadmins that are comfortable with Linux and there is a huge community behind it.
- Debian is extremely stable.
- Debian is easy to upgrade once a new major release comes out.
- Napp-It is available for Linux( but quite limited in functionality)
- SMB and NFS Server are not a problem
- Samba supports symlinks in SMB shares
- LUKS for encryption is well documented and has been in use for year. Many people are familiar with it, so getting support is fairly easy.
- Samba allows for something more secure than plain ntlm authentication
Cons:
- LUKS (used for the disk encryption) is single threaded(though I Encrypt the underlying disks anyway so that is not much of a problem really)
- ZFS is not native in the Linux Kernel
- Samba requires some Setup and configuration to join the domain and set up some shares(though that has gotten less since samba4 was introduced)
- group policies don’t work even if domain member
While I recommend Debian, you can also use any other Linux you are already comfortable with. The general concepts and many of the configurations that you can see in the post will stay the same. You will probably have to change some commands to fit your distribution though.
Warning: Your current Active Directory might not be prepared for Linux yet
Let’s take a break from the file server for a minute and talk about Active Directory.
As you know you can add Linux servers to an Active directory as members. But Linux handles users differently than windows.
When you join your Linux server to an AD, Samba maps Windows users to Linux uids and Windows groups to gids.
That is pretty neat, but if you have more than one Linux server it can happen that one user will have different uids on different servers.
This will be worse the more Linux servers are connected to your Active Directory because your nifty little management scrips will return inconsistent results between servers.
There is already a simple solution for this exact problem.
The rfc2307 specifies Active Directory schema extensions that extent user and group objects with properties that are relevant to Linux.
With the rfc2307 schema extension in place the Linux uid of your user will be stored in the Active Directory. This allows you to have consistent uids for your domain users across all Linux servers.
And on top of that Microsoft already provides management tools for those extensions that integrate into the normal Active Directory management tools.
Active Directory Domains created with newer Samba4 versions do have these extensions installed by default.
If you created your Active Directory with a beta version of Samba4 then you need to apply a schema modification to your Active Directory.
On the windows side you have to install the “Identity Management for UNIX” on one of your domain controllers if you are running Server 2008. Server 2012 seems to come with rf2307 extensions in the schema by default.
The following steps will show you how to extend the schema of an Samba4 Active Directory domain.
This will likely also work on Windows if you run the ldap command against a Windows Domain Controller, but you should use the Microsoft provided way on them unless you have a good reason not to.
Just follow these simple steps to upgrade your schema:
- Log into your Samba Domain Controller
- Find the correct path for sambas schema extension files. The Debian default is “/usr/share/samba/setup/”
- The next step would be to manually edit the file and then take your DC offline to run the file against the sam.ldb of your DC.
But if you are aslazyefficient as I am you will appreciate this much simpler solution( there is also no downtime with this one):sed -e 's/${DOMAINDN}/dc=example,dc=com/g' \ -e 's/${NETBIOSNAME}/EXAMPLE/g' \ -e 's/${NISDOMAIN}/example.com/g' \ /usr/share/samba/setup/ypServ30.ldif | ldbmodify -H ldap://dc.example.com --option="dsdb:schema update allowed=true" -k yes -iJust replace the references to the example.com domain with the correct values for your domain and run it.
- You should see the following output after the command ran:
Modified 55 records successfully
Once you have an Active Directory schema that can handle the RFC2307 extensions, you still need a way to manage the uids and gids that your Active Directory users and groups will have under your Linux installs. As mentioned above, Microsoft supplies a tool for that. You just need to install it:
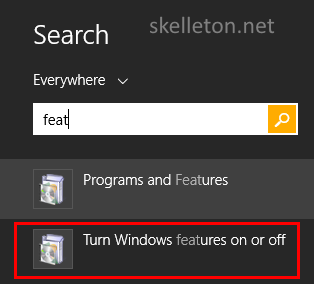
- Search “features” in the windows start menu search of your admin computer and select “Turn Windows features on or off”
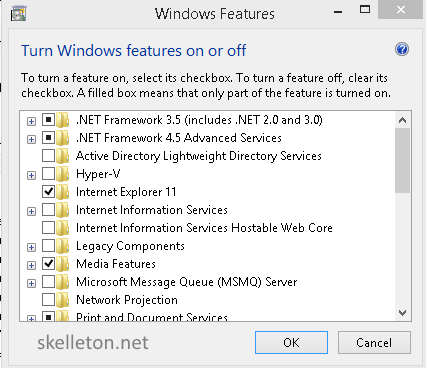
- The management window “Turn Windows features on or off” will open
- Navigate to “Remote Server Administration Tools” and extend the tree. Extend the Role Administration Tools. Open AD DS and AD LDS Tools. Extend the tree for AD DS Tools.
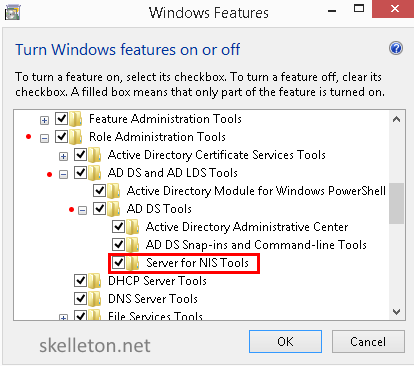
Select “Server for NIS Tools” and click OK - Now you have an additional tab in you Active Directory users and computers management:
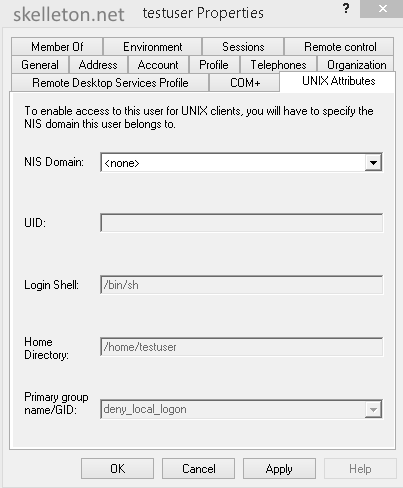
- Select your domain as NIS domain if you want a user or group to have UNIX Attributes. This will fill out the important UID or GID fields. You can prevent a user from logging into your linux servers altogether by giving him /bin/false as shell. If you do that he will still be able to use the samba shares from this server, so this is probably a good setting for most of your users.
How to prepare your old ZFS based Server for Migration
Armed with all that knowledge it is time to get your hands dirty. If you are not planning to migrate old data over to your new server you can skip this chapter.
If you are coming from another ZFS based system, you should export all zpools that you want to migrate. While this is not strictly necessary, it can save you some headache later on.
The export is fairly easy. It is just a few clicks if you use Napp-it:
- Login
- Navigate to the Pool Management
- Click the export link on any pool that y ou want to bring over to your new system.
If you don’t run napp-It, simply get on the command line and run the following command:
zpool export poolname
That’s it you are done with the preparation.
How to Install a fully encrypted Debian
You might ask yourself: why you should I encrypt a server it is in a locked room?
Let me ask you: Why not?
My current file server manages to give me almost full gigabit throughput and it does not have AES-NI to speed up encryption. Any remotely modern server has this these days and Encryption will have no impact on your performance.
Also Servers do get stolen even if they are in locked rooms. It happened to a customer of mine three separate times in five years in three separate offices. Just consider what kinds of confidential data could get into the wrong hands.
Even more so do you have process to safely decommission your server that includes securely wiping the disks?
Because I have seen old electronics being repurposed by disposal facilities.
Don’t risk it!
Just follow these easy steps to get an fully encrypted Debian system(or skip ahead if you know how to install Debian):
- Boot from the Debian net install CD. You will be greeted by this screen:
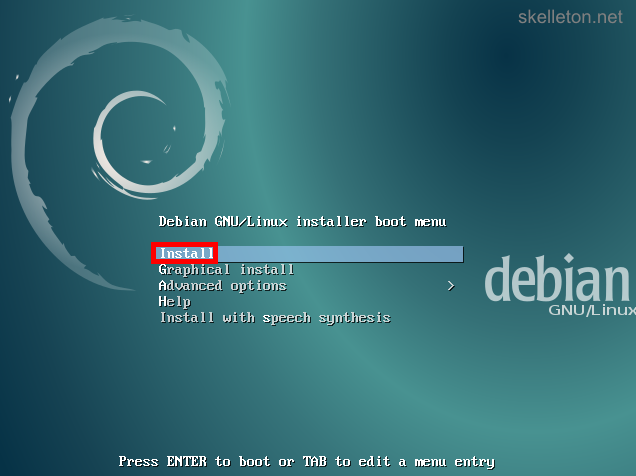
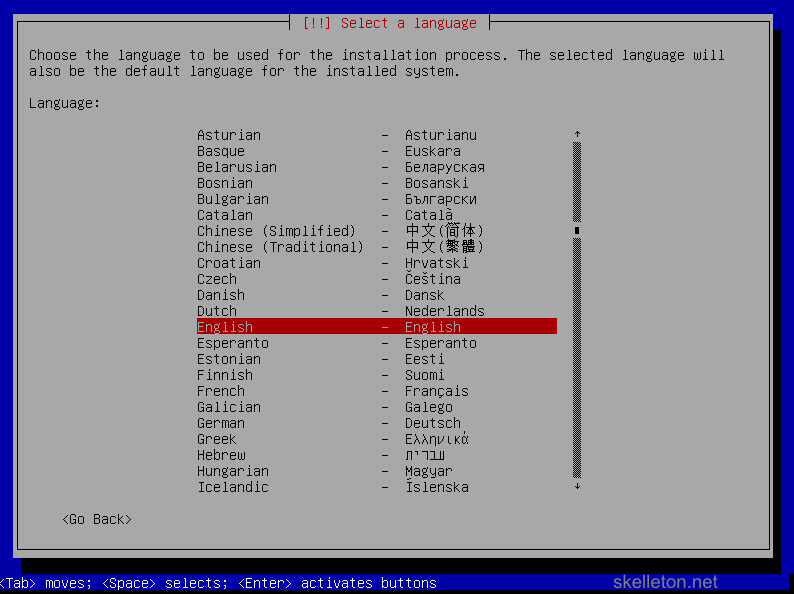
Select Install and press Enter. - Now you will go through the basic system and user configuration first select you language by using the arrow keys on this screen:
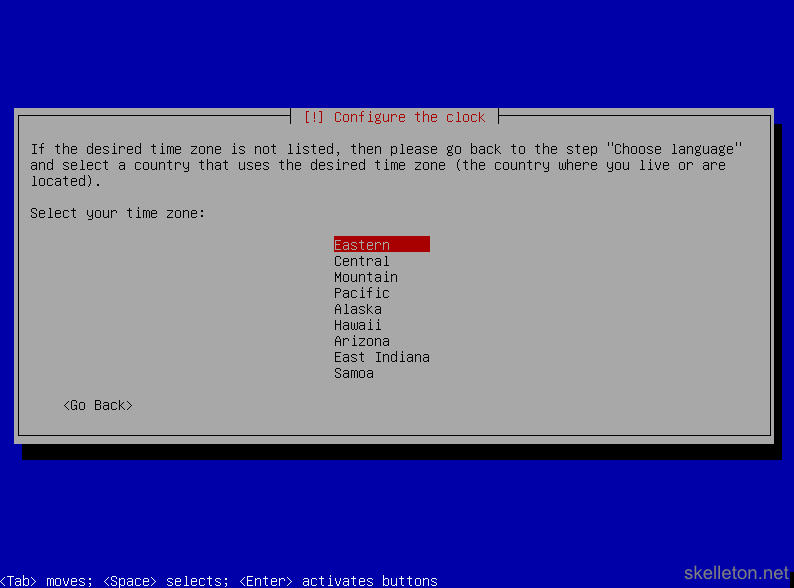
- After you press Enter you have to select your time zone:

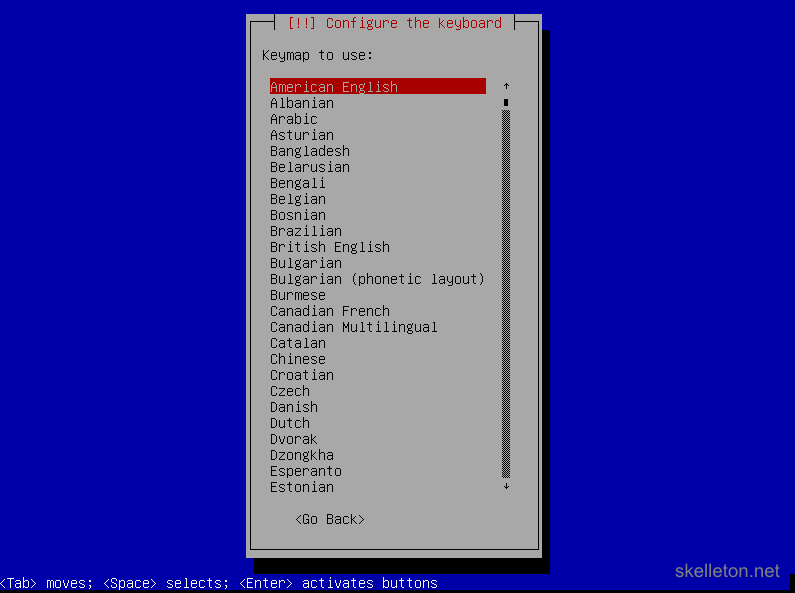
Confirm your choice with Enter. - On the next screen you have to select your keyboard layout and press enter to continue:
- Now you have to choose a host name for your server. This is what your server is called on the network:
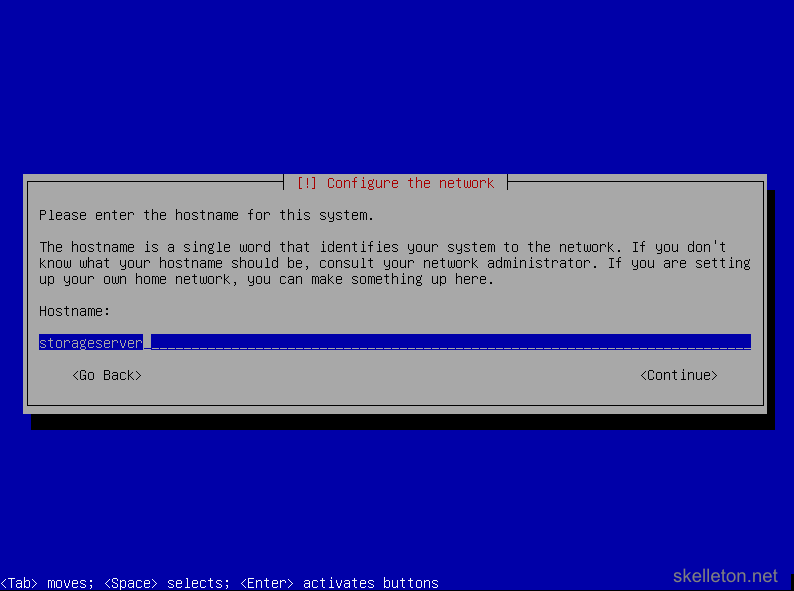
If you don’t have a naming schema yet, just do what I do and name your server after it’s primary function. - After that you have to choose the domain name for the server:
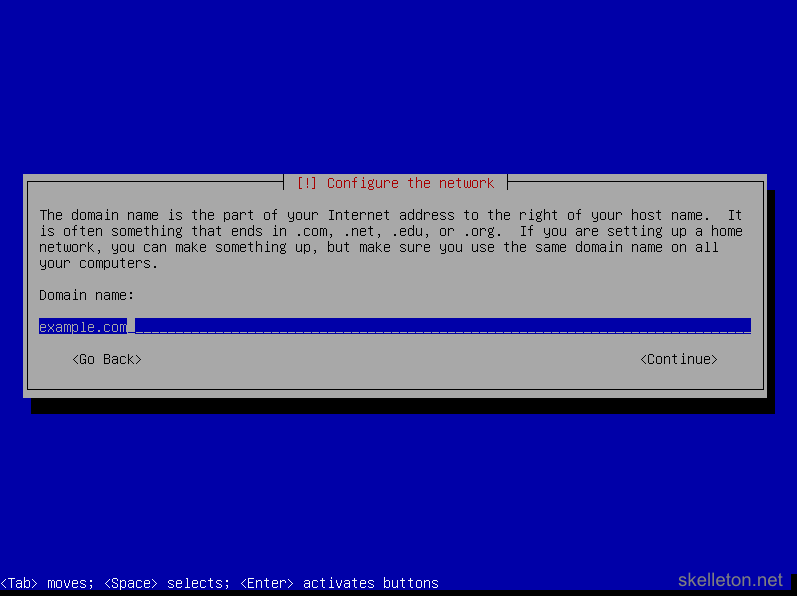
Enter the full name of the Active Directory domain the server will be in later on. - Next you will have to choose a password for your root user. This user is similar to the default administrator in windows and should get a really strong password:
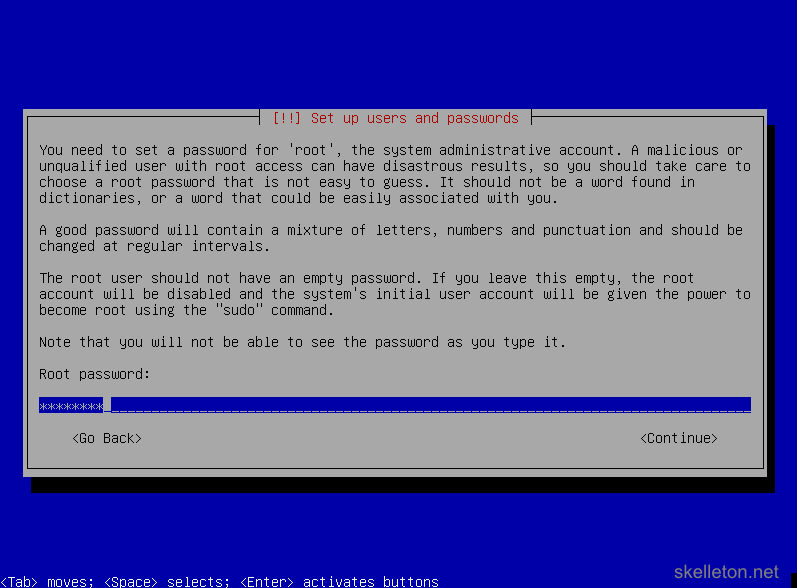
After you entered the password and pressed enter there will come another very similar screen to verify your password. Just enter it again and press enter. - Next you have to create a new user account for yourself. Try not to use any account names that you are currently using in your Active Directory:
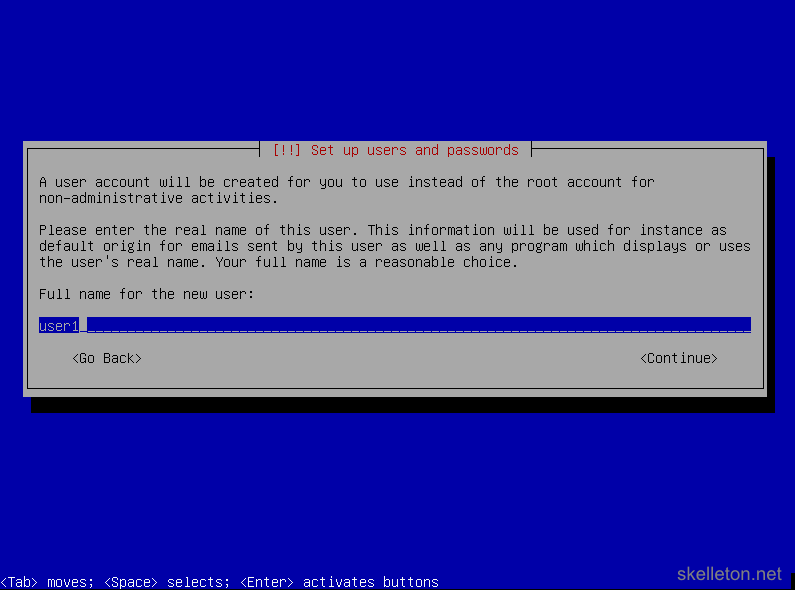
- As you might have guessed, you have to choose a password for this user:

There will also be a password verification screen again. - The last part of the basic system configuration is choosing your time zone:
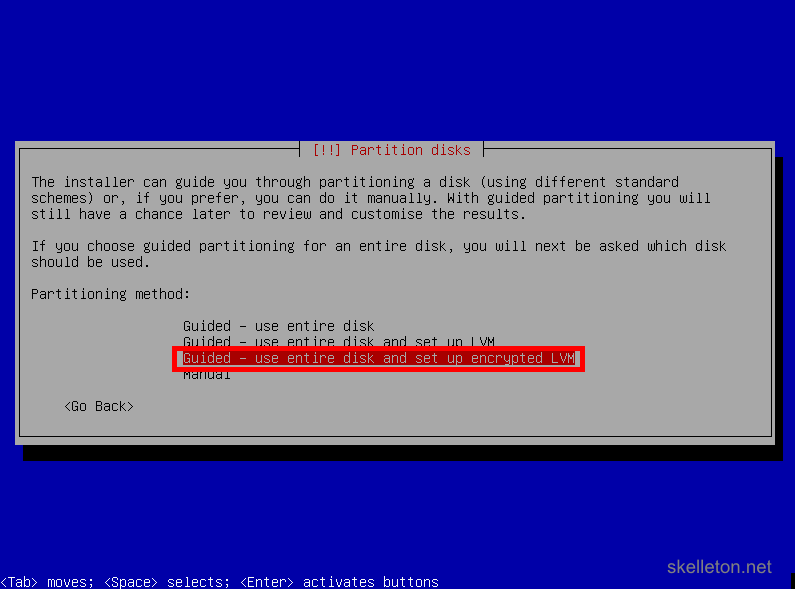
- Now you get to the disk configuration. You should stick with the guided configuration unless you have specific needs, that are not covered by the guided configuration. To create a fully encrypted server, choose Guided – use entire disk and set up encrypted LVM:
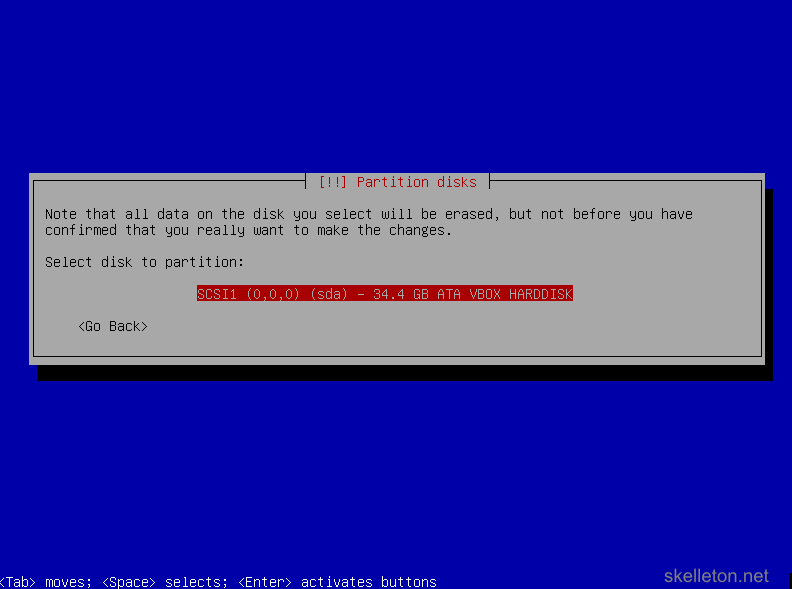
- Select the disk you want to install Debian on. This screen shot only shows one disk available, your file server will likely have more disk in it and show them all. Be careful to select the correct disk:
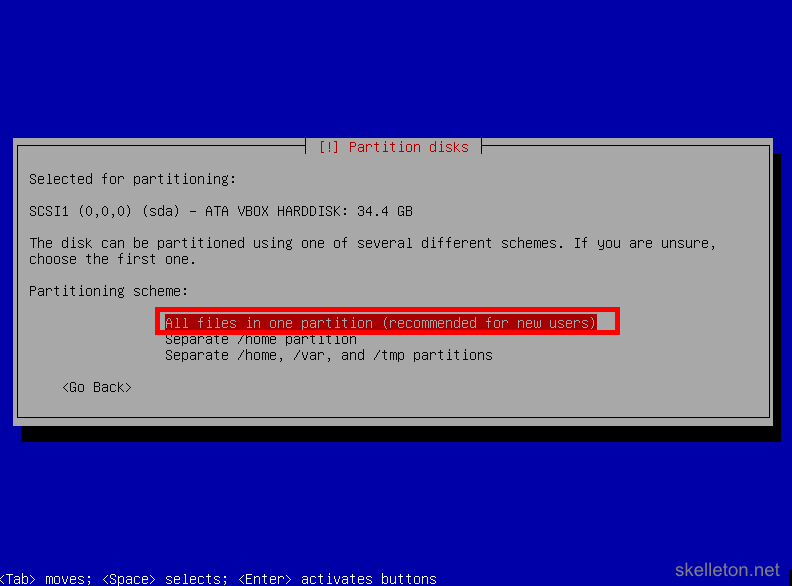
- Next you have to select the partitioning scheme. Just leave this on the default setting, all your data will be stored on the ZFS volumes that you will have to create later on:
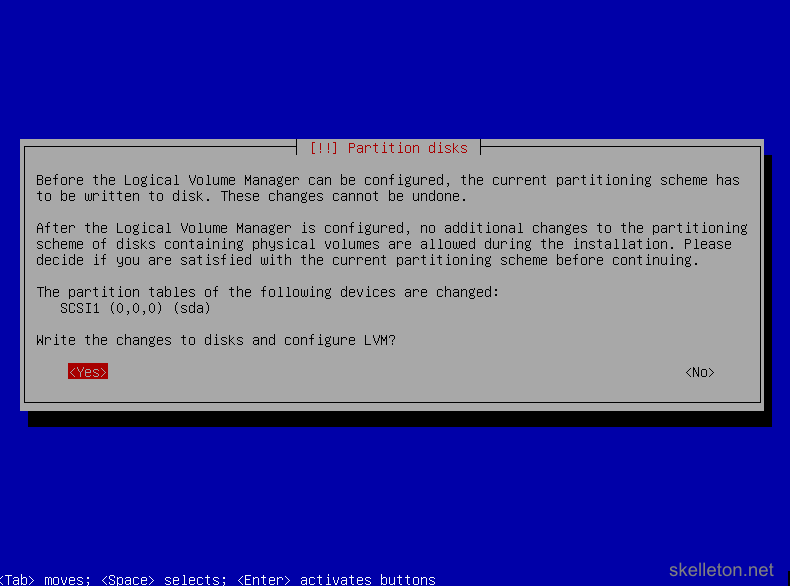
- Now you will have to confirm your choices. Make sure that you selected the correct disk and choose Yes:
- This will start a process that fully erases the selected hard disk by overwriting it with random data:
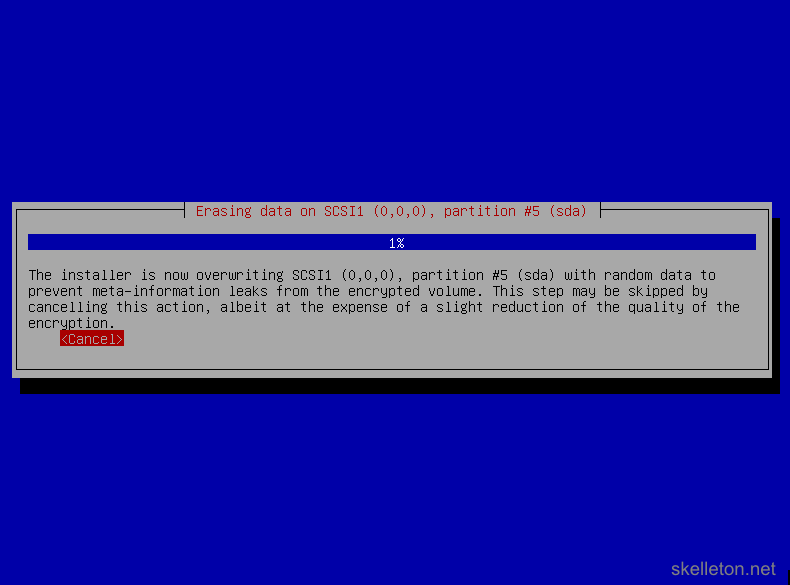
This can take a while!
If you are impatient, you can cancel this process and the installation will continue normally. But your disk encryption might be easier to break in the end and an attacker could potentially determine how much encrypted data you have stored on the disk. - Now you have to choose a passphrase for your disk encryption. This should be a secure password of at least 20 characters. There is no reason to go absolutely nuts with password, because the disk encryption can be managed with LUKS later on. LUKS allows you to add new keys(passwords) to the disk and delete old ones.
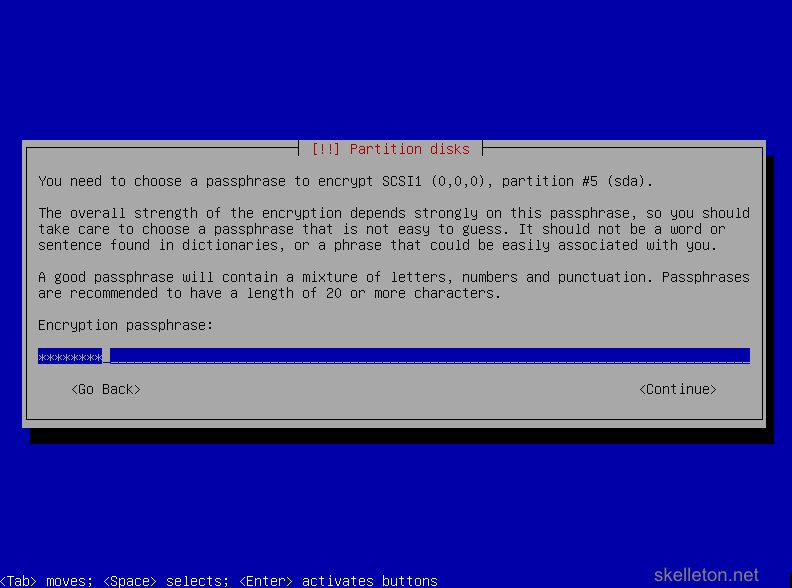
Once you have entered the password you will have to confirm it again. - After your set up your disk encryption, you will have to confirm the partitioning of the disks, because the actual operating system partitions will be written to the encrypted part of the disk:

- Once you confirmed the partitioning, you will be asked if you really want to write those changes to the disk:
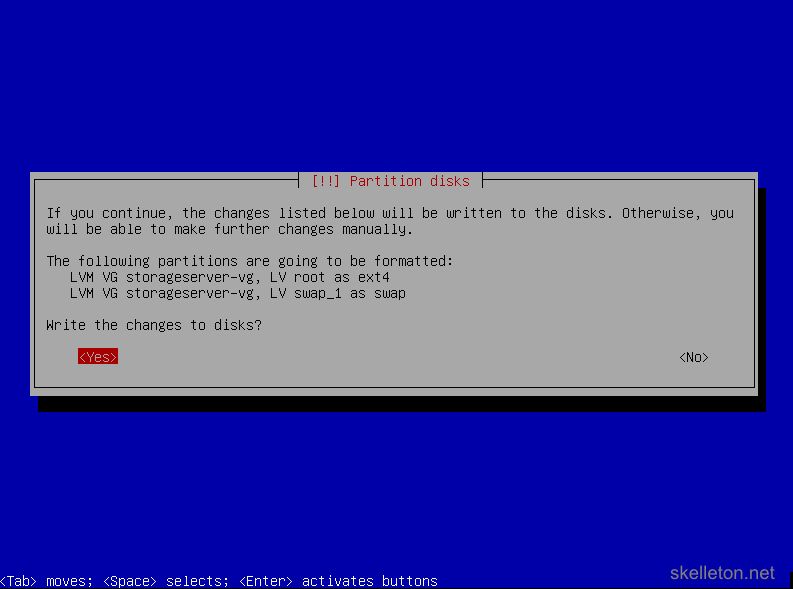
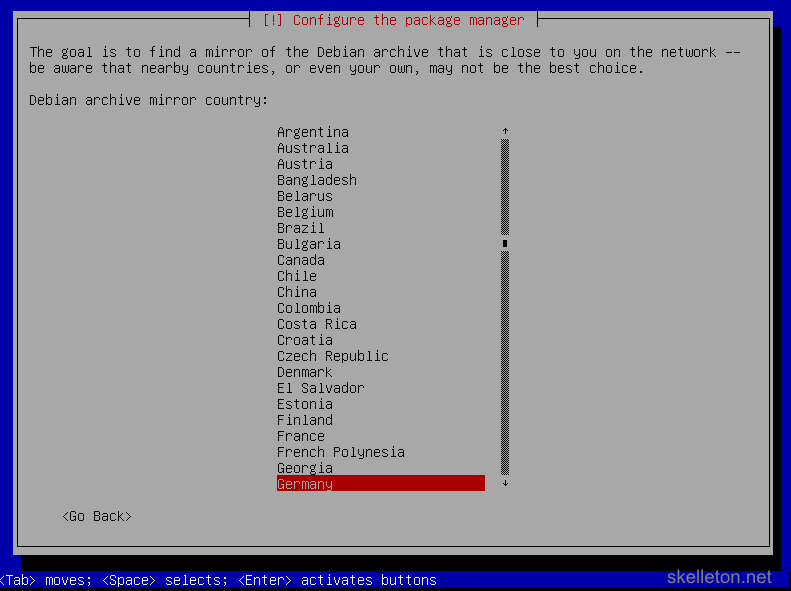
Choose Yes. - Now that you are done with the disks, you will have to configure the package system and choose the software to install. This is actually fairly straight forward. First you have to choose the country you want to download Debian from. Chose your country or any nearby country, that allows for fast download speeds:
- Next you will have to choose a so called mirror. This is a server where Debian and all its software packages will be downloaded from. You can choose any server in the list:
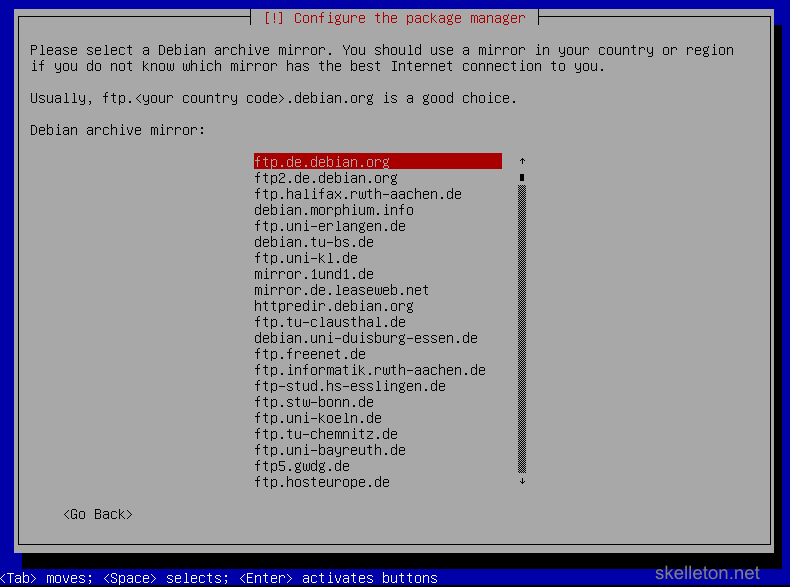
And if it should turn out to be a slow one, you can still change it later. - Next your will be asked to configure your proxy:

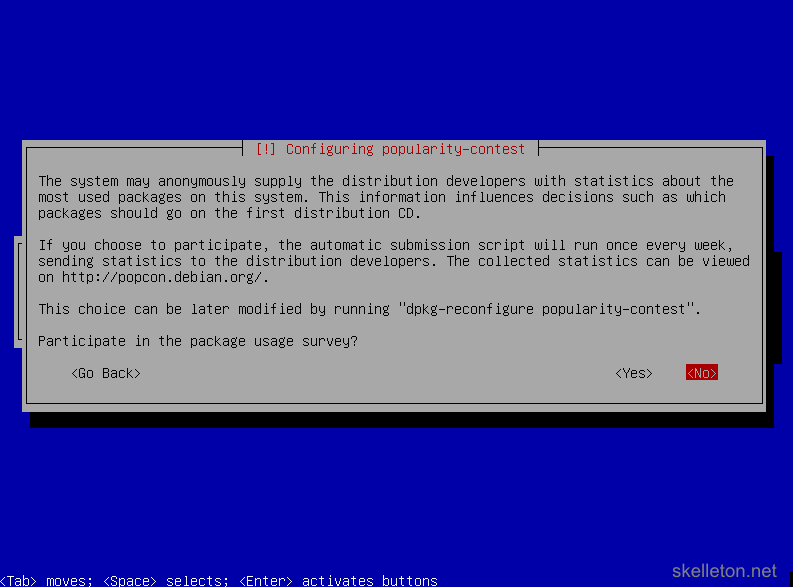
If you are in your homelab you probably won’t need one, just leave the line blank and select continue. If you are in a business and you do not know if you need a proxy, ask your network team. Though you probably are not supposed to set up servers in your business if you do not know if you need a proxy. - After this you have to decide whether you want to take part in the automated Debian package survey. This will make no difference to the function of your server. You should however consider all your IT policies in a business environment before making this choice:
- Afterwards you will have to select the software that will be installed on your server:
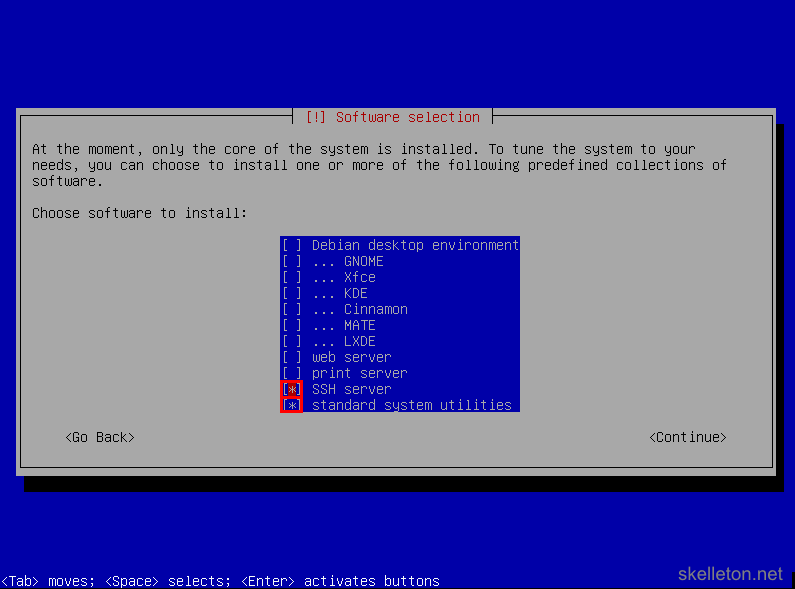
The only software packages that you need right now are SSH server and standard system utility. Select both with the space key and deselect any other package before you continue. - After the software is installed you will be asked to install the boot loader:
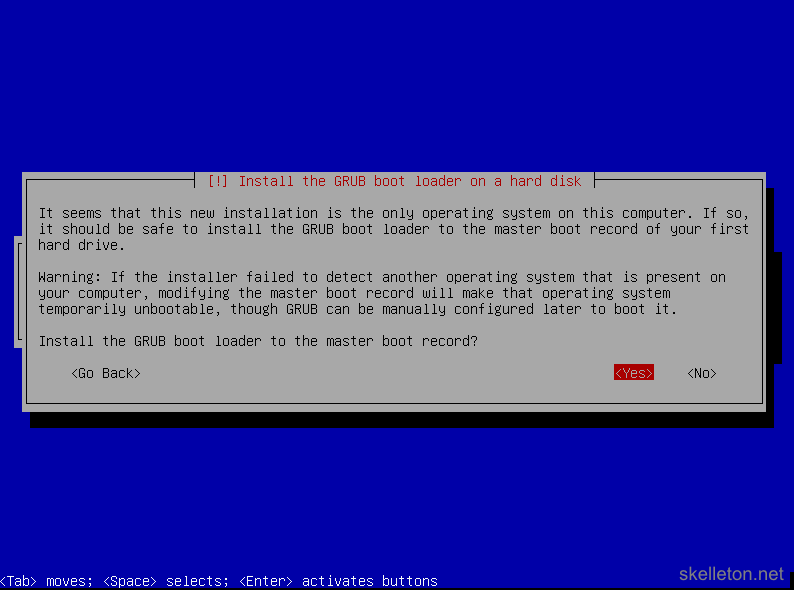
Select Yes. - The next dialog will require you to select the boot disk:
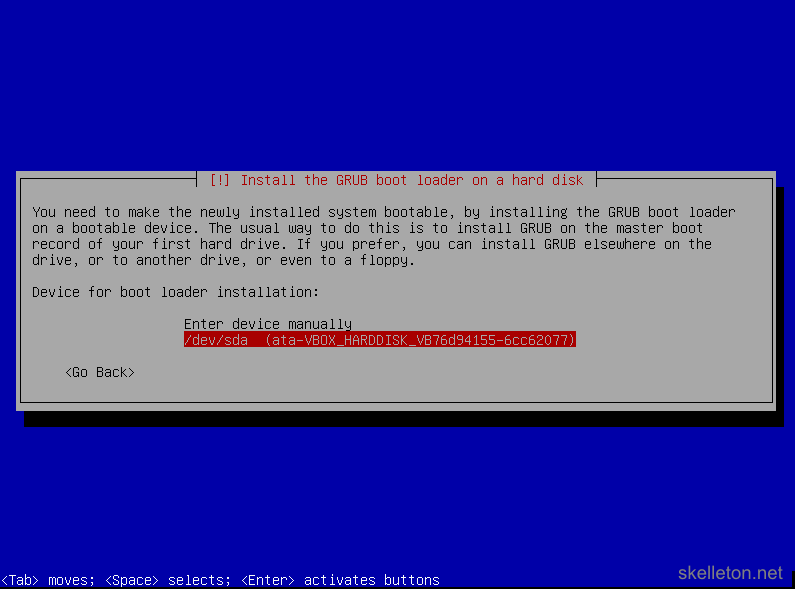
This should be the disk you installed Debian on. There could be exceptions if you try to create a multi boot system for example. Though this does not make a whole lot of sense on a server. - Afterwards you will be greeted by the install complete message:
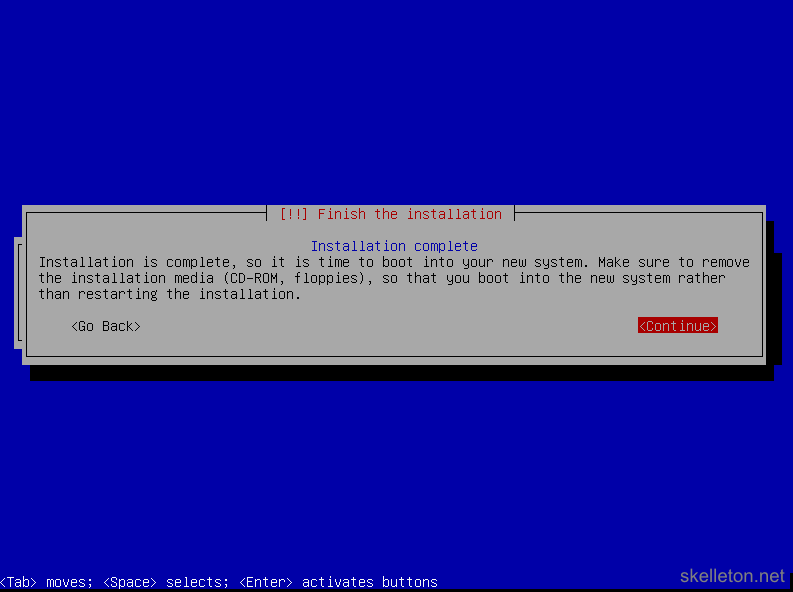
Remove the Debian CD from you server and select continue to reboot. - On you first boot into Debian you will be greeted by this screen:
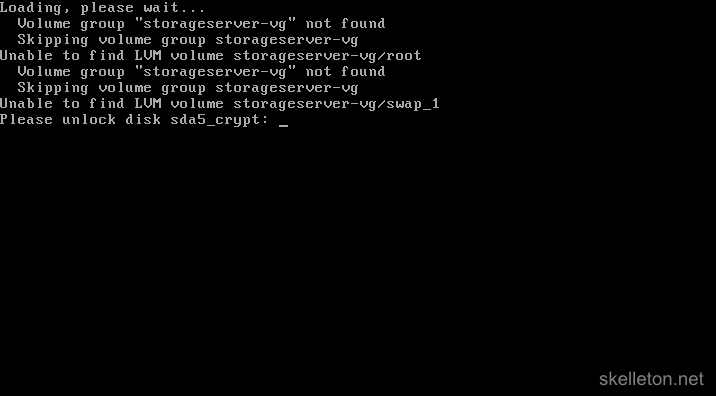
Enter your disk encryption password to finish booting.
Debian is installed what now?
After the basic installation, your first order of business is implementing a (sane) way to unlock your disk remotely.
Otherwise you would have to be in front of the server to enter the password every time you reboot. The simplest way to get remote unlock capabilities is dropbear, a minimal ssh server that can start from your boot environment.
If you have remote KVM through IPMI or a VM you can unlock your disks remotely already, but SSH is just more convenient and least Super Micro’s IPMI Implementation is in Java and is not exactly ideal.
- Install dropbear with apt-get
apt-get install dropbear
- Edit the configuration of your boot process to start networking and the dropbear service:
nano /etc/initramfs-tools/initramfs.conf
Towards the end of the file you will find the configuration options that you want to change/add:
DEVICE=eth0
IP=192.168.0.2::192.168.0.1:255.255.255.0:storage:eth0:off
DROPBEAR=y
Make sure you get the colons right in the IP line. Use the following format:
server.ip.address::gateway.ip.address:subnetmask:hostname:interface:off
- On Wheezy I was able to just use echo -n to enter my encryption key. Unfortunately this does not work anymore in Jessie.
A quick google turned up an awesome script that covers this exact problem. It has worked quite well so far and there is no need to reinvent the wheel. Just download the script and follow the steps in this blog to set it up. - Once you have the script in place, you still need a way to authenticate to the server during boot. The best way to authenticate to ssh is with your ssh key. Follow this guide if you do not have one already. Simply drop your public key as authorized key into the boot environment:
cp /path/to/your/key /etc/initramfs-tools/root/.ssh/authorized_keys
While you are at it you can remove some default keys just in case:
	rm /etc/initramfs-tools/root/.ssh/id_rsa
	rm /etc/initramfs-tools/root/.ssh/id_rsa.pub
- Now you need to update your boot environment, otherwise your changes won’t take effect on the next restart:
update-initramfs -u -k all
update-grub
- Now reboot and try to unlock your System disk via SSH. It is important that this works.
Don’t be lazy and test it now. I will wait. - By default the Debian installer sets your network to DHCP. If that does not work for you, or if you need to set up additional network interfaces, you can do so by editing the /etc/network/interfaces file.
nano /etc/network/interfaces
A basic network interface configuration looks like this:
auto eth0
iface eth0 inet static
        address 192.168.0.100
        netmask 255.255.255.0
        gateway 192.168.0.1
If you need to change the DNS settings, you can do so in /etc/resolv.conf
nano /etc/resolv.conf
At the very least you have to enter the IP addresses of your DNS Servers. As part of an Active Directory domain, you should also set the domain and search setting to the DNS name of your domain:
domain example.com
search example.com
nameserver 192.168.0.15
nameserver 192.168.0.16
How to Install ZFSonLinux in less than 5 minutes
With the basic setup of the operating system behind you,
Your server is running now but it is not much of a file server yet. In fact it can’t even access ZFS file systems yet or serve files for that matter.
To change that you will have to install some software.
The first and possibly most important piece of to install is ZFS.
Fortunately the ZFSonLinux Project has a Debian repository and it supplies a Package that adds their repository to your system..
This cuts the entire installation of ZFS down to two steps(which I shamelessly copied from here their website) :
- Install the ZFSonLinux repository:
apt-get install lsb-release
wget http://archive.zfsonlinux.org/debian/pool/main/z/zfsonlinux/zfsonlinux_6_all.deb
dpkg -i zfsonlinux_6_all.deb
- Install ZFSonLinux:
apt-get update
apt-get install debian-zfs
If you have old zpools to import do so now:
zpool import poolname
After this command your pool is mounted as “/poolname”.
And all zfs dataset can be found under “/poolname/datasetname”
How to Make your Linux Server talk to Windows: Samba4
By now you are the proud owner of a perfectly fine Linux Server with ZFS. Unfortunately the server can’t share files with your windows computers yet. For that you need Samba4.
On Debian there are two options to get samba4: You can use the package that is supplied by the Debian Maintainers or you can use the package from SerNet.
The SerNet package tends to be more current than the Debian one, but at the time of this writing they do not have any packages for Jessie on their website.
If you go with the default Debian packages and you are still on Debian Wheezy, use the Samba4 backport package. Because the Samba4 package supplied by Wheezy is still a beta version and there have been major improvements to Samba4 since that version was current.
On Jessie there is no more Samba3, so you can ahead and use the “Samba” package. These instructions are for Jessie so modify the package names as needed for other distributions.
- Install Samba and the supporting software that you will need to join the domain and use Posix ACL’s on your shares:
apt-get install samba openntpd winbind libnss-winbind acl
- Edit the ntp settings to make sure that your servers time stays in sync with your domain:
nano /etc/openntpd/ntpd.conf
Comment out or delete the lines for the Debian pool servers and instead configure at least one of your domain controllers as the sync target by using this line:
server dc.example.com
Now restart the ntp service:
/etc/init.d/openntpd restart
- Now it is time to join the server to your Active Directory. This example configuration will allow you to use the your domain users to access file shares and you will be able to use Posix ACL’s on the file shares. From Windows Clients the ACL’s will look like native NTFS ACL’s and they can be changed with the native Windows tools..
You will not be able to log into the server with your windows accounts however. Additional configuration is required for that and this configuration is not in the scope of this post.
First you have to edit the Samba configuration file. Since this will differ quite a bit from the distribution defaults, I find it easier to back up the original config file and start with a blank one.cp /etc/samba/smb.conf /etc/samba/smb.conf.bk nano /etc/samba/smb.conf
- Adapt this configuration template to your domain and you are good to go.:
#======================= Global Settings ======================= #section for the global settings [global] #you have to specify your NTDOMAIN Name as work group (the one you use when authenticating with DOMAIN\User workgroup = EXAMPLE #the security level of the domain. ADS is the correct value for an active directory security = ADS #The realm is the dns name of your domain realm = EXAMPLE.LOCAL #the keytab contains the kerberos key of the computer it will be created in this path when you join the computer to the AD dedicated keytab file = /etc/krb5.keytab #How samba should use kerberos. Again this is the correct value for an active directory kerberos method = secrets and keytab #The idmap and winbind configurations tell samba how it should map active directory users to your domain. #This setup requires your domain to have rfc2307 schema extensions. I will explain later how to get those in if you do not have them. #If you have more than one Linux server that might connect to your active directory at some, I strongly urge you to do this. #IF you only have this one Linux server I would still recommend to use this configuration, but if you don't want to do this or can't due to policies make these changes: #change idmap config EXAMPLE:backend = ad to idmap config EXAMPLE:backend = rid #remove these lines: #idmap config EXAMPLE:schema_mode = rfc2307 #winbind nss info = rfc2307 idmap config *:backend = tdb idmap config *:range = 2000-9999 idmap config EXAMPLE:backend = ad idmap config EXAMPLE:schema_mode = rfc2307 idmap config EXAMPLE:range = 10000-99999 winbind nss info = rfc2307 winbind trusted domains only = no winbind use default domain = yes winbind enum users = yes winbind enum groups = yes winbind refresh tickets = yes winbind expand groups = 4 #this server is no domain controller and thus can't possibly have any master roles. So set it that way. domain master = no local master = no #this configuration sets your shares to use extended acls. This setting is necessary to use the ntfs security settings dialog in windows to configure the filesystems security settings. #If you look at these shares from a windows client, the ntfs security tab will behave like the ones on any windows share vfs objects = acl_xattr #NTFS acls usually have inheritance, so you should enable it here as well. ACL inheritance means that all files and folders will have the security settings from their parent folder, unless you change them manually. map acl inherit = Yes #If you access the share with windows clients, it is a good idea to allow their file attributes. store dos attributes = Yes #I copied the log settings from the debian default, as they are reasonable #### Debugging/Accounting #### # This tells Samba to use a separate log file for each machine # that connects log file = /var/log/samba/log.%m # Cap the size of the individual log files (in KiB). max log size = 1000 # If you want Samba to only log through syslog then set the following # parameter to 'yes'. # syslog only = no # We want Samba to log a minimum amount of information to syslog. Everything # should go to /var/log/samba/log.{smbd,nmbd} instead. If you want to log # through syslog you should set the following parameter to something higher. syslog = 0 # Do something sensible when Samba crashes: mail the admin a backtrace panic action = /usr/share/samba/panic-action %d #===================== Share Definitions ======================= #In this last part of the configuration you can put all the shares that you want to set up. #zfs can actually do this by itself, but I prefer setting the shares up manually. #every share is its on configuration section started by [sharename] [sharename1] comment = share that I imported from my old ZFS File Server #the path the shares root has in your linux system path = /OldPool/ZFSdataset #this controls wether the share can be seen if you browse to the computer with windows explorer browsable = yes #Most likely you will want to allow your users to write to the share read only = no #disallow guests. In an Active Directory #environment every user should have an #legitimate account. guest ok = no #the admin users will always have the right to #change the security settings of the file system #one the share. Best specify a group that should #have this right. #This is especially important if you are comming #from a solaris system or a Linux System where #you were not using rfc2307 user mapping as you #may have to rewrite the the shares security #settings in those cases. admin users = @"EXAMPLE\File_Admins" - Restart Samba and join the domain. Be sure to specify a user with the rights to join a computer to the domain:
/etc/init.d/samba restart
net ads join -U administrator
The last command will ask for the users password and once you supply it the server will be part of the domain.
- In order to map the users and groups correctly you have to edit the nsswitch.conf.
nano /etc/nsswitch.conf
Find the following two lines and add winbind to them (they should be close to the top of the file):
passwd: compat winbind
group:  compat winbind
- You have to restart all involved services for the changes to take effect:
 /etc/init.d/samba restart
/etc/init.d/winbind restart
/etc/init.d/nmbd restart
- Verfiy that everthing works as expected by running these commands:
#should output domain users
wbinfo -u
#should output domain groups
wbinfo -g
#should output the uid and the groups of this users
id domainusername
If that works try accessing you share with the admin user and try changing security settings/creating files.
Once all of that checks out, you are done with the Samba setup.
How to make your Linux Server share files with other Linux Servers
NFS, especially before version 4 has far less fine graned access controls than Samba. But it is great if you want to share space for other Linux Servers because the protocol has less overhead than smb. I use it as a backup target for my Hypervisor for instance.
- Install nfs
apt-get install nfs-kernel-server
- configure your nfs share(s)
nano /etc/exports
add a share like this:
/DataPool/Backup 192.168.85.254(rw,sync,fsid=0,crossmnt,no_subtree_check,no_root_squash)
this configuration line is build in the following way:
/Path/To/Share ip.of.the.client(options for this client)
The options in the example have following meaning:
- rw: Allow read and write access
- async: reply to requests before the changes are commited to the storage. This can lead to corrupt files in the situation of an unclean shutdown, but offers better performance. You can use sync if you do not like this behavior
- fsid=0: defines this export as the root of all exports. Fsid is normally used to give each filesystem a unique identifier
- crossmnt: Allows the client to move into onther file systems mounted under this share.
- no_subtree_check: Subtree checks improve the security a little by checking the parent file system of an nfs export for their access permission. However they can cause a bunch of problems for example they don’t handle it well if one file was opened and then renamed by another user while still open. In general they cause more problems then they solve
- no_root_squash: Disables root squashing, which means that requests from uid 0 and gid 0 do net get rewritten to root. Most shares will not need this option, however this shares backs up OpenVZ guests and the permissions of all files should stay exactly as they are.
- restart the NFS service:
service nfs-kernel-server restart
How to Encrypt without loosing all the awesome ZFS features
You are here to learn how to build a fully encryptet file server, yet ZFS on Linux does not have a file system level encryption feature.
The only ZFS that currently has that feature is the (non open source) ZFS implementation from Oracle.
You are in luck however because Linux comes with its own disk encryption known as LUKS.
The only real limitation of LUKS is, that it is still single threaded. This is only a minor concern however, since you use luks to encrypt the drives from which you built the ZFS vdevs.
Every drive will have its own LUKS thread and thus effectivly making LUKS multi threaded.
Before you can actually encrypt your disks, you have to find out, what your disks are called. Simply run this command:
lsblk
And you will get an output like this: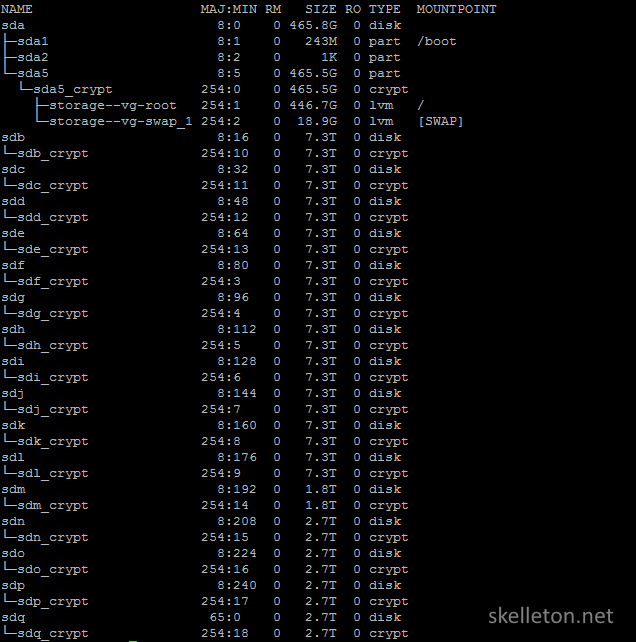
This output shows all block devices in your system and what names they are mapped to. In the example you can already see the encrypted drives for every disk in the system.
If you are building a ZFS Server with more than 4 or 5 disks, consider using the same password for all disks in one vdev or zpool.
While this lowers the security somewhat because only one disk per pool has to be decrypted successfully before the attackers know the password for the entire vdev or pool.
This is not a realistic concern if you use strong enough encryption and passwords.
Alternately you could built a master-slave like setup for all disks in the pool. LUKS does allow for that, but in that particular configuration your LUKS master key is stored only on the master disk and if that disk crashes a restore of the pool will be a pain.
If you go that route make sure to back up you master key.
A small warning before you start:
Please ensure that you do not encrypt the wrong disk. If you encrypt a disk, the old data on it will be lost.
Once you have identified all the disks that you want to encrypt, run this command on every one of them:
cryptsetup -v --cipher aes-xts-plain64 --key-size 512 --use-random --verify-passphrase luksFormat /dev/sdx
Lets have a look at the different options of the command used above:
- -v:is used to get verbose output from the command.
- –cipher:sets the encryption cypher the aes-xts-plain64 is one of the currently recommended cyphers. Please note that in XTS mode only half of your key is used. Set your key size accordingly.
- –key-size:This sets the Key size. If you are using an xts cipher, set this to twice the value you actually want.
- –use-random: defines the random source for the master key. The use-random option will create a slightly stronger key, but if you do not have a lot of entropy sources on the sytem, it will take some time to create the key.
- –verify-passphrase: queries for the passphrase twice, this prevents you from creating a passphrase with a spelling error in it.
- luksFormat: is used to initialize the LUKS partition
- /dev/sdx: This is the target device of the LUKS operation
If you used the same encryption password for every disk in the zpool, you can decrypt your entire zpool with a script like this:
echo -n "Enter the Media Pool Password: "
read crypt_pw

echo -n $crypt_pw | cryptsetup open --type luks /dev/sdf sdf_crypt
echo -n $crypt_pw | cryptsetup open --type luks /dev/sdg sdg_crypt
echo -n $crypt_pw | cryptsetup open --type luks /dev/sdh sdh_crypt
echo -n $crypt_pw | cryptsetup open --type luks /dev/sdi sdi_crypt
echo -n $crypt_pw | cryptsetup open --type luks /dev/sdj sdj_crypt
echo -n $crypt_pw | cryptsetup open --type luks /dev/sdk sdk_crypt
echo -n $crypt_pw | cryptsetup open --type luks /dev/sdl sdl_crypt
echo -n $crypt_pw | cryptsetup open --type luks /dev/sdm sdm_crypt
echo -n $crypt_pw | cryptsetup open --type luks /dev/sdn sdn_crypt
echo -n $crypt_pw | cryptsetup open --type luks /dev/sdo sdo_crypt
echo -n $crypt_pw | cryptsetup open --type luks /dev/sdp sdp_crypt
After you have run the script or mapped your decrypted devices manually, you can use them to create your new zpool with a simple one liner like this one:
zpool create NewPool -o ashift=12 raidz3 /dev/mapper/sdf_crypt /dev/mapper/sdg_crypt /dev/mapper/sdh_crypt /dev/mapper/sdi_crypt /dev/mapper/sdj_crypt /dev/mapper/sdk_crypt /dev/mapper/sdl_crypt /dev/mapper/sdm_crypt /dev/mapper/sdn_crypt /dev/mapper/sdo_crypt /dev/mapper/sdp_crypt
This looks a bit confusing, but I promise once you know what is going on here it is really straight forward.
Let’s have a look at the different parts of the zpool create command and what you need them for:
- NewPool: is the name of the Pool. This name will also be used as mountpoint for the pool when it is imported by your system. So the pool MediaArchive will be available under /MediaArchive
- -o ashift=12: -o are the options that are used to create the pool. In this case the only option used is the ashift option to ensure that the filesystem will be aligned for 4k sectors. Please consider this carefully, the ashift setting of a vdev can’t be changed later on.
- raidz3: Specifies the level of parity in the vdev.Possible options are:
- none: leave this parameter out and list only a single disk and this disk will be added as is to the pool
- raidz: This is a raid mode with parity. In normal raidz one disk will be used for parity. This means you can loose one disk without loosing any data. Due to the way the data is written, the vdev will only have the write performance of its slowest member. There are also the raidz2 and radiz3 which work in the same way but have two and three disks for pairity data respectively.
- mirror: This works like a raid one. Every disk in the mirror will have the same data. The write performance is that of a single disk, but reads will be performed accross all disks. Unlike RAID1 ZFS allows you to mirror up to three disks.
- /dev/mapper/sdf_crypt /dev/…This is a list of every disk in the vdev. Please use the mapped paths of the decrypted devices.
How to Transfer Data between ZFS file systems
Now you can transfer the filesystem from your old zfs pool to your new pool. ZFS has the tools to accomplish this right out of the box. You can even easily transfer entire file systems between different computers.
One thing that might not be immediately apparent about those built in tools is that they only transfer snapshops.
You can not use them to transfer the current state of a file system without making a snapshot first.
This might sound unnecessarily complicated at first, but it is not a limitation due to the way snapshots work in ZFS. Snapshots do not cost any additional disk space until a file actually changes.
And by transferring snapshots you know exactly which files have been transferred in which state because any changes during the transfer do not affect the snapshot.
And the transfer of any subsequent snapshots of that file system is incremental. That mean only changed or newly added files will have to be transferred to the new volume on subsequent runs of the transfer job.
Combined these properties make the move very painless for your, because you can keep the old share online and run zfs transfer jobs until both zpools or datasets are identical and then you can switch your users to the new share.
You can use this simple command to create a snapshot:
zfs snapshot OldPool/dataset@snapshotname
Now you can send the Snapshot to your new pool by piping “zfs send” and “zfs receive” together:
zfs send -R OldPool/dataset@snapshotname | zfs receive -Fdvu NewPool
If you data happens to reside on two different server with ZFS, simply run the send command on the source server and the receive command on the receiving server.
How to transfer your data from Windows to Linux
If you happen to migrate from Windows, you can’t really transfer your old data this way. But you can use robocopy to transfer your data to its new location incrementally. It is not as straight forward as a zfs send and zfs receive but it gets the job done.
robocopy source destination /ZB /E /COPYALL /V /LOG:userfilestransfer.log
Warning: do a few basic checks before moving on
Once you have transferred all the data, you should check your future Windows shares because the acl options may not be what you need for samba and posix ACL’s.
Run following command to see how the ACL options are currently set:
zfs get all | grep acl
This will display two properties for all your zpools and datasets:
- aclinherit: this property defines if and how inheritance of ACL’s is supported. Windows acl’s rely on inheritance, so set this to passthrough if it is not already set to that.
- acltype: this property defines if the pool supports of ACL’s. It will likely be set to off and for windows like ACLs to work on your share, you will have to set this to posixacl
You can use these commands to change the acl properties for every pool that doesn’t have the required options set:
zfs set acltype=posixacl NewPool/dataset
zfs set aclinherit=passthrough NewPool/dataset
Update
You should also set xattr=sa for every pool. Otherwise deletes won’t be processed entirely until you remount the pool. This means that all the space a deleted file takes up will still be marked as in use. It took me a while to notice, because I rarely delete anything on my storage server and the volumes are quite large.
But if you have a higher turnover in files, this might be a problem.
In order to set this setting simply enter folloing command for every zpool. The datasets on the pool will inherit this option unless your explicitly change that:
zfs set xattr=sa NewPool
Now you can switch your users over to using the new pool, by editing the path of the samba share in your smb.conf and the path of your nfs export.
While your users are working on the new pool you may wish to see if the transfer caused any data errors and repair them if they happend.
You can do this by scrubbing the zpool:
zpool scrub NewPool
The scrub can take quiet some time, especially on large pools but your users can continue working during the scrub.
If you want to know how far the scrub has gotten, you can open another ssh session and run the zpool status command.
zpool Status
The output of this command looks like this: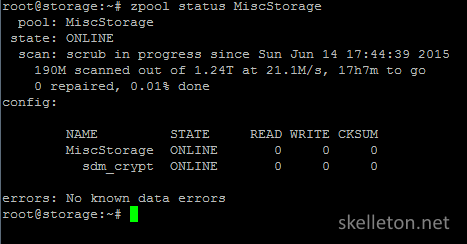
How to get rid of obsolete zpools, datasets and snapshots
Once the scrub is done, your data should be ok again if any bits flipped during the transfer. If you want to keep using some of the drives from your old zpool, you should destroy the old zpool before you reassign the drives. BE CERTAIN NOT TO ENTER THE WRONG POOL NAME HERE:
zpool destroy OldPool
This will destroy the entire pool.
If you only want to destroy datasets that you no longer use you can use this command:
zfs destroy -r DataPool/tempdata
If you have snapshots that are no longer needed but do not want to touch the current data of the dataset do this:
zfs destroy -r DataPool/tempdata@snapshotname
This will delete all files that are not in another snapshot or your current data.
After you have destroyed the old pool and reassigned any of the old disks as you see fit, you can take any disks that are not needed any more out of your server.
How to Be Smart in a World of Dumb users
Have I told you already that snapshots in ZFS are awesome?
Yes?
Here is another reason why:
zfs-auto-snapshot
This little Tool from the ZFSonLinux developers can be configured to take snapshots at certain intervals and to keep the last x snapshots.
This might not sound like much but how often has a user asked you to restore a file that he accidentally deleted or overwritten? Now you won’t have to look for the correct tapes anymore.
Snapshots will also help you mitigate the impact of one of the horror scenarios in recent time: a cryptlocker infection. With snapshots you can simply roll back to a snapshot from a point before the infection happend. You don’t have to spend hours restoring data anymore. (You still have to clean the infected computers though, sorry I can’t help you with that)
Now that you are convinced have a look at how it works: By default ZFS auto snapshot will create cronjobs in the following directories: cron.hourly, cron.daily. cron.monthly and cron.d
The the job in cron.d will run every 15 minutes.
By default the job creates snapshots for all your zpools where the option “sun.com-autosnapshot” is not set to false.
This option is not set by default. If you want to disable automatic snapshots for any of your pools or datasets use the following command:
zfs set com.sun:auto-snapshot=false PoolName
If you want to explicitly allow automatic snapshots for a dataset or zpool use this command:
zfs set com.sun:auto-snapshot=true PoolName/dataset
This setting will automatically be inherited to all child datasets under the point you set it. But you can change it for every child and it will not be overwritten.
I use this on my documents pool. It is great, if I mess up and accidentaly overwrite or delete something important I can recover a very recent copy of the document.
And due to the way ZFS snapshots work, you will have very little overhead from this feature on your avarage document pool. Though you might not want to run this on a pool that holds the virtual disks for your Virtual Machines.
If that alone was not great enough it gets better. With one little change in your Samba share configuration you can access those snapshots from Windows Previous version feature.
Just change the share like this in your samba configuration:
[users]
comment = Private Folders for users
path = /NewPool/users
browsable = yes
read only = no
guest ok = no
admin users = @"Example\File_Admins"
follow symlinks = yes
wide links = yes
vfs objects = shadow_copy2
shadow: snapdir = .zfs/snapshot
shadow: sort = desc
shadow: format = zfs-auto-snap_hourly-%Y-%m-%d-%H%M
shadow: localtime = no
This loads the hourly snapshots as windows previous versions. Unfortunately samba does not accept wildcards in the shadow format and you can only configure one shadow format.
Despite this little limitation is this feature extremely practical. And from Windows it is so simple to use that most of your users will be able to learn it. Have a look:
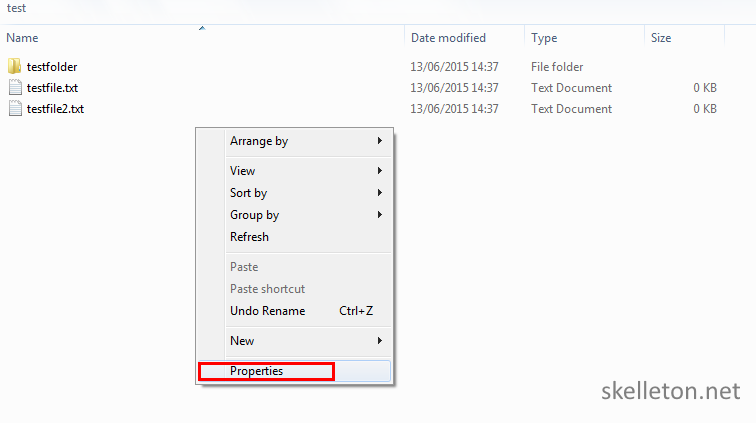
- Right click in a folder or on a file that is snapshotted regularly and select preferences:
- Click the Previous Version tab. You will see a list of all snapshots with the time they were taken:
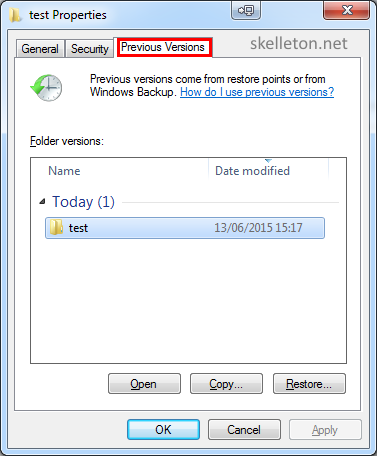
You can immediately restore it or you can browse the folder or view the file by double clicking the snapshot in the list or by clicking open.
If you did’t realise what I just said or you think you read it wrong: The restore is so simple that you can tell your users to restore their stuff on their own.
Just write a small guide on how to use Windows Previous Version and send it out whenever a user asks you to restore one of his files from backup and close the ticket.
As awesome as snapshots are, they can’t replace your other backups. They can only be another layer in your backup strategy. They will not protect you from sudden massive hardware failure, floods, fire or theft. And yes I have had customers who had these issues. Trust me you do not want to argue with firefighters to enter a burning building to get the tapes out because the dumbass responsible for the backup stored them next to the server.
Can’t Keep up? Automate common maintenance tasks
Remember the disk decryption script that I have shown you earlier?
Well now that you have a zpool on these disks, extend the script to also import your zpool for you.
Just add this line to the end of the script:
zpool import PoolName
One of the greatest threats to File Server is an unnoticed disk failure. And since we all know that regular manual checks just won’t happen in the long run, you should script the check.
I wrote this little script to query and parse the status of every single zpool in the server and then send a status report. The script runs every morning on my server.
#!/bin/bash
#This script queries the status of all zpools on the system and sends the output to the admin

pool_error=0
pools_and_errors=''
body=''
admin_email='admin [at] example [dot] com'
#get the status for the pools
for pool in $(zpool list | cut -d ' ' -f 1 | tail -n +2); do
	pool_state=$(zpool status $pool | grep 'state:' | cut -d " " -f 3)
	if [ $pool_state != ONLINE ]
	then
		#there are pool errors count and get the error
		pool_error=$(($pool_error + 1))
		pools_and_errors=${pools_and_errors}${pool}" has the status "${pool_state}"\n"
	fi
done

#build the email
if [ $pool_error != 0 ]
then
	#echo $pool_error
	#echo -e $pools_and_errors
	subject='ERROR: '$(hostname -f)' has '${pool_error}' zpools with errors'
	body="These are the pools with problems:\n"${pools_and_errors}"\n\n"
else
	subject='zpool status for '$(hostname -f)': all pools are OK'
fi
body=${body}'Here is the detailed status for all zpool on '$(hostname -f)':\n'$(zpool status)

#send the email
echo $subject
echo -e "$body" | mutt -s "$subject" -- $admin_email
This script relies on a correctly configured email subsystem on the server. I usually use ssmtp on my non mail servers servers, as this is a very convenient way to redirect all system E-Mail to my mail server.
You can schedule this script as a regular cron job.
You are still missing one last piece to benefit from all the awesome of ZFS. By now you are aware of the importance of scrubs, but you still have to run them regularily.
Just schedule them with cron because running them by hand would be tedious and prone to be forgotten. Depending on the size of your pools and the amount of write activity the exact schedule can vary. But the general recommendations are, smaller pools that get a lot of writes, should be scrubbed once a week. And larger pools with fewer writes should be scrubbed once a month.
In order to plan a custom cronjob you can edit the crontab.
nano /etc/crontab
An entry for a scheduled scrub can look like this:
1 0 1 * * root zpool scrub NewPool
This example will scrub the zpool “NewPool” on 00:01 every first of every month. The Basic cron syntax is very simple:
It starts with a definition of the time the job is supposed to run. All time definitions can also have the following entered instead of one specific value: “*”. The asterisk stands for every time this unit is reached(every minute, every day and so on). Wheras a construct like this “*/15” specifies a regular interval.
You have to use 5 space sepparated values to indiacate the time, they have to be in this order:
- Minute: the minute a job should run. You can use any number between 0 and 59 here.
- Hour: the hour a job should run. Valid values are numbers between 0 and 23.
- Day of Month: The day of the month a job should run. Valid values are 1 to 31 but you should be careful not every month has a 31st day
- Month: The month on which a job should run. It is not at all surprising that the numbers 1 to 12 are valid values here.
- Day of the Week: The Weekday jobs should run. Valid valus here are 0-7. There is 8 possible values here, to account for countries that start the week with a sunday and those that don’t. Sunday is assined to 0 and 7.
After the time you have to state the user as whom the command is run. In this case it is “root”
And after that you can enter the command that should be run. In this case it is “zpool scrub NewPool”
Some final advice
After you have read this, it might seem like protecting your data is a lot of work. But consider that this process is a one time thing and much of the necessary maintenance is automated.
If I still have not convinced you ask yourself this:
What would you do if this important customer documentation was not available in a year from now and they have a big project that relies on it?
What would I do if those baby pictures were lost 10 years from now?
What would I do if somebody stole my storage device and put the private information on it on the internet?
In the end it always comes down to two points:
- If your data is important to you you have to Protect it.
- You probably do not realize how important your data is to you until you lost it. This post happend because customer ignored warnings about backups and the dangers of RAID0.
I hope that you think about how important your data is to you and that you take measures to secure. Even if you end up choosing a different solution because it is a better fit for you.
And since we are somewhat on topic. Do not forget Backups. If you don’t have remote backups you don’t have backups. If you have not tried to restore your backups successfully, you don’t have Backups.
Have you had any issues with the Seagate Archive drives under heavy write load?
I considered following your guide to build a 3 drive zfs storage for my fathers photo archive, but reading threads like https://bugzilla.kernel.org/show_bug.cgi?id=93581, I am not quite sure I trust these drives enough at the moment :-/
I have not had anz issues with my Archive Drives. Initially I had an heavy write load on them though Im not sure if that is the same as your definition.
After I created the Array I transferred about 30TB onto it with zfs send and receive.
Even since then they have a fairly low write load.
Maybe 5-30 GB a day mostly large files.
This should still be within the intended use scenario and they perform great for me.
I currently the CPU is bottlenecking the Server even when writing though (about 100MByte/s max sustained write speed).
This might change if can give the server a CPU update, but I honsetly don’t expect anz issues with the drives anymore at this point.
If your father intends to use the Disks really just as archive he should be fine. But I am not quite sure if they would be the best drives he wants to use them for his live copy of pictures he is editing in photoshop or such.
Thanks for your reply.
The workload for the described use case would be transferring several terabytes of jpg and raw images from my fathers many external drives.
After that, I expect regular writing of maybe 10gb a month, so that should not be a problem. Drive throughput is no issue in this scenario, but failing drives while copying data (as some people described in the kernel bugzilla) would be a gamebreaker.
Well as far as the initial transfer goes I had no issues. About 30TB to a Raidz3 of 11 drives.
The first time they are filled there shouldn’t be many differences to normal drives. Once you start overwriting data things may change.
Just a little follow-up 😀
I got a little RaidZ running with 3 drives (8TB).
The biggest hurdle was actually installing ZFS, as my Archlinux was too new and I had to use the DKMS-version of the ZFS module to autocompile it on every kernel update.
After that, everything went smoothly. Transfer speed is a bit crappy, when doing larger transactions (1.5TB initial copy operation took the better part of a day), but as I add only small amounts of data on a daily basis, this is fine for me.
I just wanted to say thank you for posting such a detailed guide, they are becoming increasingly rare! I found your blog through google and followed your instructions to setup an encrypted 4TBx12 drive raidz2 array in a vm running under proxmox with 2 m1015’s in it mode and the onboard sata controlled passed through to the VM.
Hi,
Can it be true that ZFS-on-linux, this github version can do a encryption, what do you think ?
h t tps://blog.heckel.xyz/2017/01/08/zfs-encryption-openzfs-zfs-on-linux/#Compile-and-install
Well it has been in the works for a while. I have not yet tested it, but I might do so with the next zvol I put in the server.
What about using FreeNAS or TrueNAS?
Both are NAS/storage specific distributions and there is even certified hardware for them.
Skelleton thanks for your detailed post!
I would like to install a new file server on production environment.
After reading your post I’ll try the ZFS for sure.
The hardware based on Dell R720 with 4disksX2tr (hardware raid 5 setup).
Thanks again!